
The BepInEx console will not appear when launching like it does for other games on Thunderstore (you can turn it back on in your BepInEx.cfg file). If your PEAK crashes on startup, add -dx12 to your launch parameters.
MoreBadges
Helps modders add custom badges to their mods and the ability to make their custom cosmetics unlockable through badges.
By Snosz
| Date uploaded | 2 weeks ago |
| Version | 0.1.2 |
| Download link | Snosz-MoreBadges-0.1.2.zip |
| Downloads | 3087 |
| Dependency string | Snosz-MoreBadges-0.1.2 |
This mod requires the following mods to function
BepInEx-BepInExPack_PEAK
BepInEx pack for PEAK. Preconfigured and ready to use.
Preferred version: 5.4.2403README
More Badges
Helps modders add custom badges to their mods and the ability to make their custom cosmetics unlockable through badges
To Modders
As this mod is in its early stages, I would appreciate if any modders who have issues with the mod or have suggestions for improvements, to please reach out to me. The best way to reach me is through the More Badges thread on the Peak modding discord server.
Guide
This guide will be improved in future updates as the mod matures.
To add a custom badge, you will first need to download this mod and place the dll file as a reference in your mod project. For now, the easiest way to ensure that your mod loads after More Badges is to add a dependancy at the top of your plugin file.
[BepInDependency("com.snosz.morebadges", BepInDependency.DependencyFlags.HardDependency)]
This mod currently relies on the badge name being unique and consistent. To ensure this we add some constants so that we can easily use them later and only need to define the badge names once. The recommended format for badge names are below, dont worry the display name can be whatever you like.
public static class BadgeNames
{
    // The ideal format for your badge names would be something like Badge_ModName_BadgeName
    public const string BonkBadge = "Badge_BonkBadge_Bonk";
    public const string ExtraBonksBadge = "Badge_BonkBadge_ExtraBonks";
}
There are two types of badges, persistent badges which track progress across all runs such as for example a 3 consecutive expedition victories badge, and a run based badge, which requires the player to meet the conditions in a single run otherwise the progress will reset. Unlocking either type of badge is permanent and will save to a badges.json file in the mod folder, and when the player loads the game back up the unlocked badges will be there.
With the mod added as a reference, the process to creating a badge is as simple as below:
// This adds a badge that will trigger as soon as the condition has been met.
MoreBadgesPlugin.CustomBadge bonkBadge = new MoreBadgesPlugin.CustomBadge(
    name: BadgeNames.BonkBadge, // Using the BadgeNames const to avoid typos!
    displayName: "Bonk Badge",
    description: "Bonk yourself with a coconut.",
    icon: bonkBadgeIcon //128x128 Texture2D
    );
// This adds a badge that will trigger only if the conditions are met during a single expedition.
MoreBadgesPlugin.CustomBadge extraBonkBadge = new MoreBadgesPlugin.CustomBadge(
    name: BadgeNames.ExtraBonksBadge,
    displayName: "Extra Bonks Badge",
    description: "Bonk yourself 2 times with a coconut in a single expedition.",
    icon: extraBonkBadgeIcon, //256x256 Texture2D
    progressRequired: 2, // How many times the condition needs to be met to unlock the badge. Defaults to 1
    runBasedProgress: true // This determines if the badge progress is reset every expedition. Defaults to false,
	//nameLocalizations: nameLocalizations // If you want to support more than just english, you can pass a list containing translated strings in the appropriate order
	//descriptionLocalizations: descriptionLocalizations
    );
By default, if no localization lists are passed through, it will automatically create one with the default language being english. To create a localization, you must create a list and add the translated strings to the appropriate index as shown below: English = 0, French = 1, Italian = 2, German = 3, SpanishSpain = 4, SpanishLatam = 5, BRPortuguese = 6, Russian = 7, Ukrainian = 8, SimplifiedChinese = 9, TraditionalChinese = 10, Japanese = 11, Korean = 12
Once you have created your CustomBadge you can add it as shown below. Register badge takes a CustomBadge and an optional cosmetic name. If a cosmetic name is added, the cosmetic will be locked until the badge associated with it has been unlocked.
The cosmetic name must be the exact same name as the CustomizationOption you created. This is to ensure that the badge is applied to the correct cosmetic. This is not ideal but as there are multiple different mods providing custom cosmetic options, this is the simplest way for now. In my case I am using More Customizations which sets the cosmetic name to be the same as the ScriptableObject it requires you to create. It is important that you name your cosmetic to something unique, such as with the badge names above.
MoreBadgesPlugin.RegisterBadge(bonkBadge, "Hat_MyModName_HatName");
MoreBadgesPlugin.RegisterBadge(extraBonkBadge);
Lastly, to make the badge unlockable you need to figure out what condition is required and where progression should be added, and then just call:
// badgeName and progressAmount
MoreBadgesPlugin.AddProgress(BadgeNames.BonkBadge, 1);
In the example mod BonkBadge, I patch the DropItemRpc function in CharacterItems to check if the local player dropped a coconut, and if so track that coconut by its itemID. I then patch Bonkable.Bonk to check if the local player was hit, a sample from that code is below:
[HarmonyPatch(typeof(Bonkable), "Bonk")]
public static class BonkPatch
{
    static void Postfix(Bonkable __instance, Collision coll)
    {
        var character = coll.gameObject.GetComponentInParent<Character>();
        if (character == null || !character.IsLocal) return;

        if (__instance.gameObject.TryGetComponent<Item>(out var item))
        {
            if(item.itemID == Instance.thrownCoconutID)
            {
                MoreBadgesPlugin.AddProgress(BadgeNames.BonkBadge, 1);
                MoreBadgesPlugin.AddProgress(BadgeNames.ExtraBonksBadge, 1);

                Instance.thrownCoconutID = null;
            }
        }
    }
}
As for the rest, MoreBadges handles that for you. The goal is to make it as easy as possible to add custom badges, obviously this isnt yet at that point but with feedback from modders I hope to continue to improve this.
Further info
I suggest keeping the icon size to either 128x128 or 256x256 to keep file sizes down. Currently you will have to create the asset bundle yourself and load it in your plugin. Below is an example of loading an asset bundle consisting of a folder of icons that has been added to a resource file in Visual Studio.
byte[] bundleBytes = Resource1.badges;
iconBundle = AssetBundle.LoadFromMemory(bundleBytes);

var bonkBadgeIcon = iconBundle.LoadAsset<Texture2D>("Badge_128Bonk");
var extraBonkBadgeIcon = iconBundle.LoadAsset<Texture2D>("Badge_256Bonk");
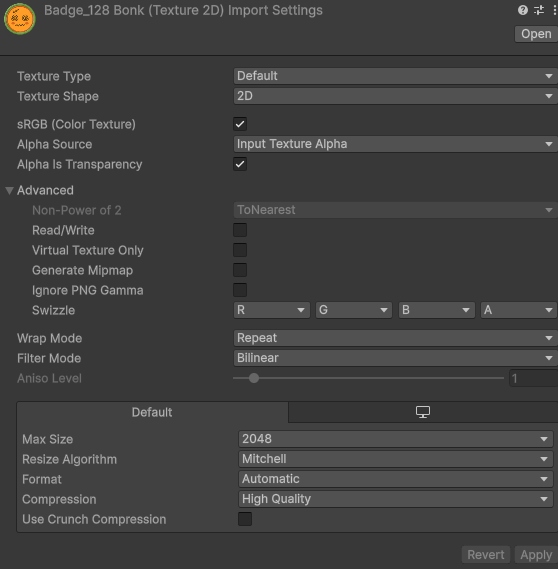
The import settings for the badge texture in Unity should be as shown below.
Current Limitations
- Badges do not show on the character's sash, this will be implemented in a future update.
- Asset bundling icons is currently a manual process, this will be made easier in a future update.
- Badges are currently added by modders programatically, but asset bundles for the badge data and bundle scanning is being considered.
CHANGELOG
0.2.0
- Accolades screen now has pagination to handle large badge counts
- Modders can now use GetProgress and GetCustomBadgeStatus to see the progress and isUnlock status for a badge.
- Modders can now load CustomBadgeData via AssetBundle as an alternative to creating through code.
- Fixed bug where badges on sash would not render for other players that had less custom badges than the player.
- Fixed bug where customisations would unlock for the wrong badges.