

DSPMiaoToolbox
妙妙工具箱(作者:妙妙在路上 抖音@妙妙在路上)。如果此工具箱对您制作蓝图时有帮助,欢迎您来抖音给我点个关注!❤❤❤❤❤。默认快捷键【Alt+5】,小功能详见readme。 English: Miao Toolbox — small helpers for blueprint building. Default hotkey Alt+5. See readme.妙妙工具箱(DSPMiaoToolbox)
戴森球计划(Dyson Sphere Program)多功能工具箱 · Requires BepInEx 5.4.17
🌐 中文(点此展开 )
中文
写在前面
你好呀,我是妙妙在路上(抖音@妙妙在路上),一个沉迷极限密铺蓝图的 DSP 玩家。
这个工具箱最早没啥远大理想:几个小模组功能重复、配置东一块西一块,索性合并成一个 DLL 好管理。后来玩的时候"这里要是能顺手一点就好了"的念头越来越多,就干脆一个个写进去,攒成了现在这个大礼包——传送带间距、蓝图工具箱、拖拽对齐、回归线自由摆放、悬停坐标、无碰撞摆放、隐藏建筑、指北针、统计悬浮、传送带定高、悬浮传送带、建造秒完成、建造师模式、传送带切割、一键填埋矿脉、分拣器伸入、星球透视、地下建筑清理、批量拿取传送带货物,全在这一个包里。
如果它对你的蓝图创作有帮助,欢迎来抖音给我点个关注!❤❤❤❤❤ 有些思路参考了 Soar、时桑等大佬的模组,向各位尊贵的大佬致谢! 界面跟随游戏语言自动切换中英文,需要 BepInEx 5.4.17。
所有功能的开关和快捷键都集中在游戏内的「妙妙蓝图工具箱」窗口(Alt+5)里改,改完立即生效并写回各自的 cfg,不用退出游戏。UI 里有些按钮标了颜色,机械化走线的时候不至于点错功能 :)
最近更新
- 「去物流塔材料锁定」修好了:之前这个功能清库存保持标记的时候,手伸得太长,把物流塔进出口端口的配置也一起清掉了——贴出来的塔输出管线就断了(也就是"有些塔怎么没输出了"的那个问题)。现在只动库存保持标记,端口、输出、物流方式全都原样保留。用旧版生成过去锁蓝图的,麻烦从原蓝图重新生成一次,旧结果里端口配置已经被破坏,救不回来。
- 批量拿取货物更聪明了:Shift+Ctrl+左键点传送带,除了沿输入连接递归整条上游链,现在连正在被爪子夹送的在途货物、以及爪子拾取端连着的整条上游链也一并拿进背包,一条线从尾巴点到头。
- 蓝图框选模式新增 Alt+V 快速输出:框选建筑后按 Alt+V,一个对话框里完成"缩放/旋转 + 平移",回车直接进粘贴模式,相当于原版【立即使用】的强化版。斜着贴回归线摆厂房、整组产线旋转对齐,再也不用绕去 Alt+5 面板了。
- 传送带"老三样"毛病修了一轮:Shift 保持高度不再在窗口失焦/切后台时突然失效(改读物理键盘状态);90° 拐弯带某段间隔不均的问题从游戏内部爬升逻辑上根治;间距被误关后"游戏里看不到任何状态"的老问题,现在在工具箱里有总开关、关着拉带还会低频提醒你。
安装
用 r2modman / Thunderstore Mod Manager 导入本包,或者手动把 BepInEx/plugins/DSPMiaoToolbox/ 整个目录放进游戏的 BepInEx/plugins/ 下面。
建议先把原来装的独立版小模组(TropicBeltSpacing、DSPBlueprintOffset、DSPHideSurface 这些)卸掉再装本包,功能重复虽然不至于出错,但没必要装两份(装了独立版 DSPHideSurface / PlanetVeinBurier 时,工具箱内置的对应功能会自动休眠)。DSPBlueprintOffset 和 DSPBPColliderSnap 首次运行时会自动把旧模组目录里的配置复制过来,之前自定义的快捷键都能保留。
更新版本直接覆盖 DLL 就行,cfg 全部向后兼容,迁移逻辑会自动处理(比如快捷键拆分、默认值变更这类事都会一次性自动迁,不会覆盖你自己改过的键位)。
功能逐条说明
下面按功能逐个讲。每条都会写清楚:它是干什么的、怎么用、默认快捷键、有哪些可以调的地方。
1. 传送带间距(F9 开关)
拉传送带的时候自动把节点间距放大,用更少的传送带覆盖同样的距离,省料也省设施。
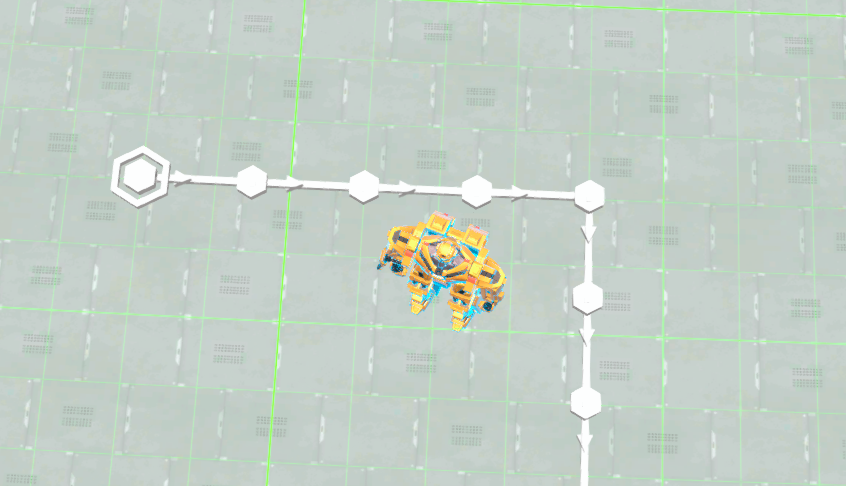
- 默认「自由间距」模式:1.6~1.8 当地格一节,每节不超过 √5.3 米(2.302m,原版硬上限减 3cm 余量),所以建出来的带子蓝图在原版游戏里照样能重建。
- 「蓝图安全(整数格)」模式:严格只用原版的整数格节点,间距全部是整数格,对蓝图洁癖玩家友好。cfg 里
BlueprintSafe可开。 - 爬坡自动处理:有高度差的路段会自动缩小水平间距,避免 2 格节撞上 TooFar 判定。
- 垂直抽稀(默认开):竖直往上拉带时,把高度差均分成不超过 1.45 格的节,每一段都走游戏的「直接连接」机制,又省料又美观。斜坡带同样生效。
- 远距延伸(默认开):原版网格行走最多 256 个点,1 格间距下大概 322m 就到顶了。开启后超远的传送带会自动按当前间距继续延伸,最远约 580m,末端精确落在终点上。
- 太近的强制连接(默认开):两端接口落在同一个网格里(间距不足 1 格)时原版是绝对连不上的,这里会直接建一节短带把它们连起来;拉带过程中双击 R 也有类似效果。
- F9 一键开关全部间距逻辑,工具箱「快捷键和功能开关」页也有同一个总开关(两处永远同步)。cfg 里还有 SkipClimb、SkipVertical(特殊地形整条交给原版)、LogSpacing(日志)等细项可调。间距关着的时候拉带,会低频弹条提示(10 分钟最多一条),免得你忘了它是关的。
2. 蓝图工具箱(Alt+5 开关窗口)
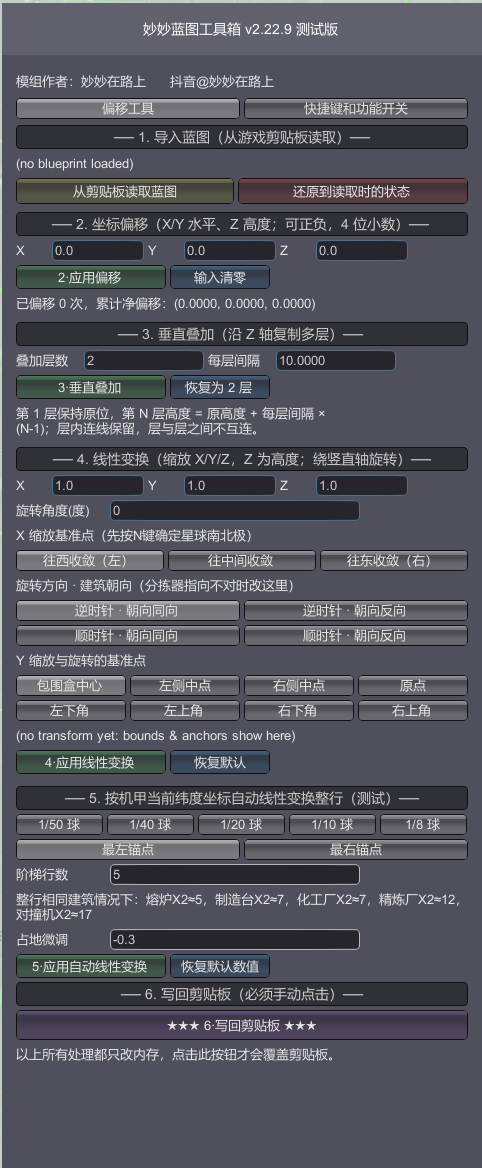
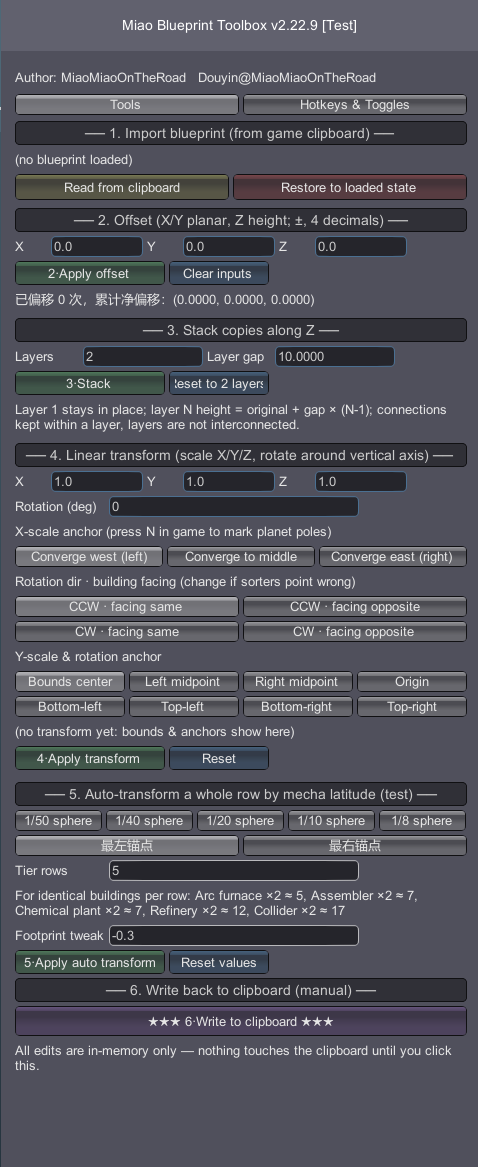
打开「妙妙蓝图工具箱」窗口,里面是蓝图的各种变换工具,两个页签:「偏移工具」和「快捷键和功能开关」。
坐标偏移:把整张蓝图沿 X/Y/Z 平移。输入框支持 4 位小数,可以反复叠加(工具会记录累计净偏移)。每次操作后都能点「还原到读取时的状态」一键撤销。
垂直叠加:把蓝图沿 Z 轴复制成多层,层与层之间不互连。层数和每层间隔自己填。
线性变换:三轴缩放 + 绕竖直轴旋转,支持选择基准点/基准轴(居中、选第一个建筑等模式)。配合回归线自由摆放,斜着贴着赤道摆一排厂房就靠这个。
去物流塔材料锁定:沙盒模式里开了「库存保持」的物流塔,存成蓝图后这个标记会跟着走,贴到普通存档就成了甩不掉的锁定。这个按钮把蓝图里所有物流塔的库存保持标记清掉——只动这一个标记,塔的进出口端口、输出设置、物流方式全部原样保留。清理完记得点「写回剪贴板」才生效。
数字输入纠错:输入框对中文输入法相当宽容——全角数字、中文句号、手滑多敲的小数点(0..25)、从别处复制粘贴带进来的零宽字符,都能自动纠正。真纠不了的会明确告诉你哪个框、原文是什么。
连接修复:偏移/叠加之后传送带和分拣器的连接关系会自动修复——重复的传送带节去重、拉开的空档按缺口补节(直线 2~4 格)、跨距不再是 1~3 格直线的分拣器自动移除。建筑上限也从原版的 255 解锁到了 15000。
写回剪贴板:改完点这个按钮,蓝图以新状态写回剪贴板,再去游戏里粘贴就是改好的。
3. 蓝图快速偏移输出(蓝图框选模式 Alt+V)
蓝图模式框选建筑后按 Alt+V,弹出一个综合对话框,输出顺序:先缩放/旋转(绕基准点),再按 X/Y/Z 平移(格):
- 三行输入:平移 X/Y/Z(格,精确到小数点后 4 位)、缩放 X/Y/Z(倍率,1 = 不变)、旋转角度(度,正 = 逆时针)。
- 基准点可选:X 缩放基准(最左/中心/最右)、Y 缩放与旋转基准(包围盒中心/左侧中点/右侧中点/原点)、旋转方向·建筑朝向四选一。
- 一个「输出蓝图」按钮搞定一切:把变换写进当前框选蓝图并直接进入粘贴模式,等效原版【立即使用】但带上了全部变换。只填平移就是纯偏移输出,只改缩放/旋转就是纯变换输出,全默认就是原样快速使用。
- Esc 取消;快捷键可在工具箱「快捷键修改」页改(默认 LeftAlt + V)。注意:这个 Alt+V 只在蓝图框选模式生效,建造模式里的 Alt+V 仍是「悬浮传送带」,两个互不打架。
- Z 超界会整体回滚并提示,不会留下改了一半的蓝图。
4. 蓝图拖拽碰撞对齐(Ctrl+Shift+N 开关)
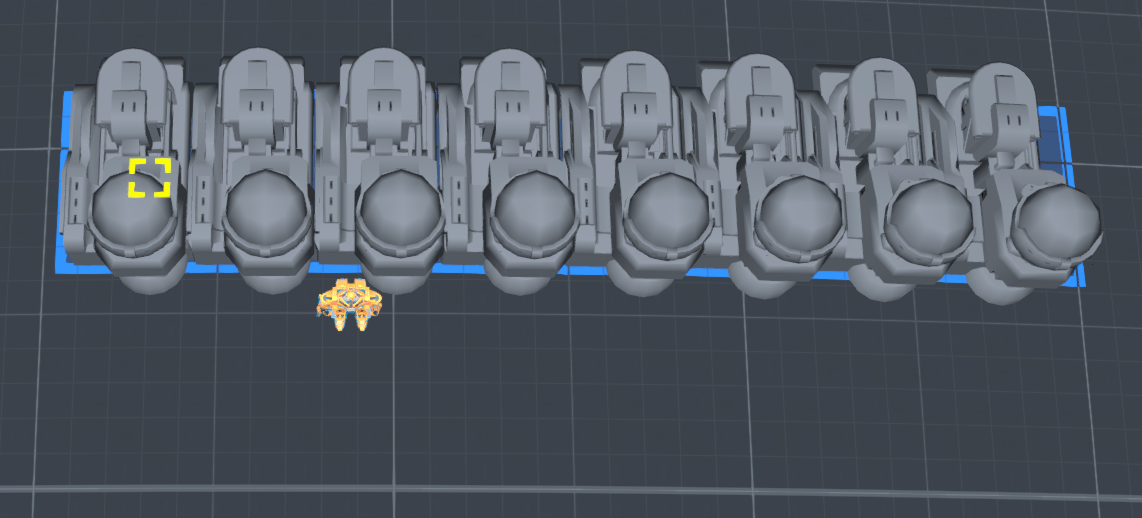
粘贴蓝图拖拽摆放时,按整组建筑真实的碰撞盒角跨度来贴合排布,而不是原版那样忽略地面网格导致建筑之间留缝或者重叠。鼠标靠近已建建筑时会自动磁吸贴合。拖拽复制的份数上限同样解锁到 15000,默认99,设置数量太大会导致游戏性能暴降!
5. 悬停坐标(Ctrl+Shift+K 开关,默认关)
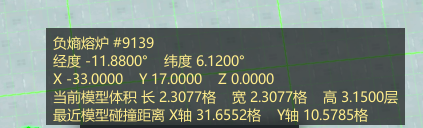
鼠标悬停在建筑上时显示:当前经纬度、与建筑 X/Y/Z 轴的距离、建筑模型体积、最近碰撞距离。对同类高塔(风电、物流塔这类)会额外显示最近同类的碰撞距离,用来对齐 spacing 很方便。
6. 蓝图回归线自由摆放(Alt+U 开关,默认关)
粘贴蓝图时无视回归线(纬度 45~48)的摆放限制和地基平台越界判定,蓝图跟着光标连续移动、不瞬移。同时统一做刚性摆放锁死蓝图物理尺寸——东西向格距按锚点纬度做 1/cos 补偿(球面经线收敛),任意纬度不变形不碰撞,跨回归线零跳变。默认关闭是因为改动原版摆放规则比较激进,需要的时候 Alt+U 打开。
7. 无碰撞摆放(Alt+W 开关)
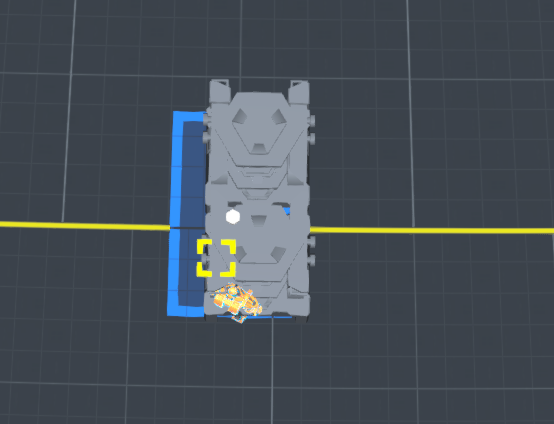
开启后摆放建筑忽略碰撞体积,可以重叠放置;机甲行走时也能穿过建筑。摆放蓝图时同样放行碰撞判定。手动摆放只放行「唯一失败原因是碰撞」的情况,缺料、距离太远这些其它错误照常拦截,不会误放。
8. 隐藏建筑模型(Alt+A 三态循环)
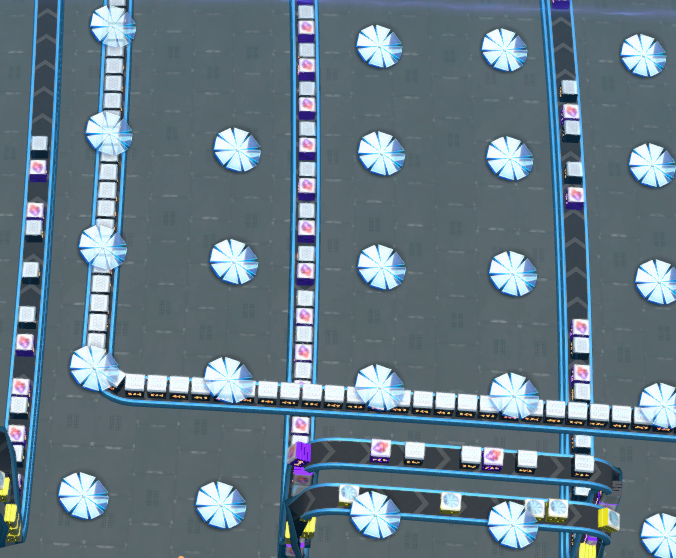
按一次隐藏所有建筑模型,再按一次连分拣器(爪子)也隐藏,第三次恢复显示。隐藏状态下传送带、矿脉、植被、蓝图虚影照常显示,被隐藏的建筑也无法被鼠标选中(拾取射线做了过滤),不会挡住你的点击。换星球自动保持生效。
9. 星球缩略图指北针(Alt+N 开关,默认开)
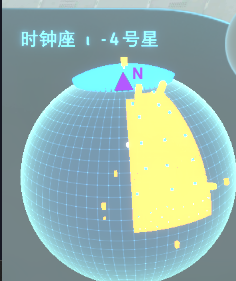
左下角星球卡片上显示紫色 N + 箭头,随视角实时旋转指向星球北极。此功能主要目的是为了直观的体现偏移是+还是-数。还有个调试模式会在小地图上叠加 P/+Y/-Y 标记用来校准。
10. 统计信息显示(Alt+M 开关,默认开)
此功能是为了在制作蓝图时方便观察各中间产物的详细信息,当前版本下可以同时监控 15 种材料(单列显示)。筛选是按照统计面板的★标记统计的。同时也兼容了击杀统计显示(某些黑雾农场可能用得到)。
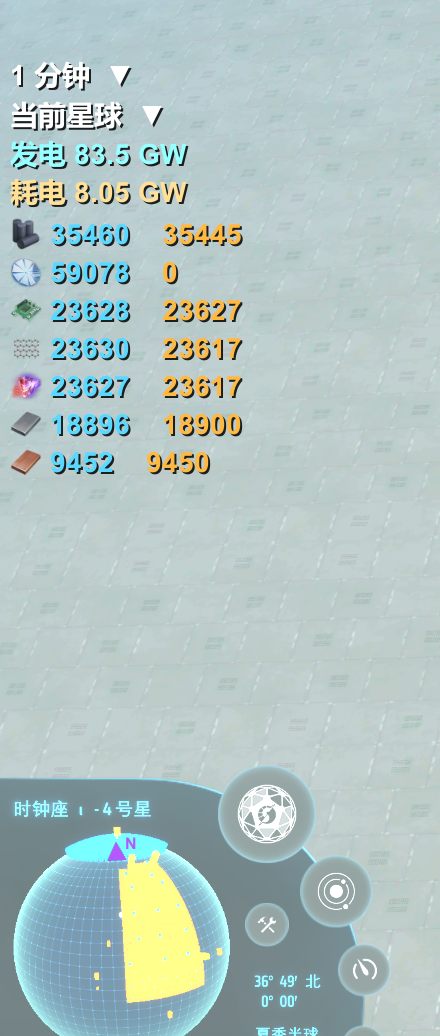
左下角星球卡片上方的实时信息悬浮显示,从上到下:
- 时间筛选(最上排):1 分钟 / 10 分钟 / 1 小时 / 10 小时 / 100 小时 / 总计,六档与面板时间框一致。
- 范围选项卡:统计全星区 / 当前星球 / 各行星系 / 各星球……选项与统计面板的范围下拉框动态同步,在这里选等于直接切面板的范围,两处永远一致。飞离星球(太空/星系视图)时如果选的是「当前星球」,会自动按统计全星区口径兜底显示。
- 发电性能(青色)和实时耗电(橙色):口径与统计面板一致。实时耗电是电网当下实际送达的功率,供电不足时会真实反映缺口。
- 收藏夹筛选行:统计面板里收藏(★ 标记)的物品会显示在这里——单列显示,每行是物品图标 + 生产数值 + 消耗数值,口径与面板同行数字完全相同,最多 15 种。统计面板击杀页收藏的敌人(枪骑、强袭者这些)也会显示为敌人图标 + 击杀数。物品按生产+消耗降序、击杀按击杀数降序。面板没勾选任何收藏筛选时,显示全部已收藏物品。数字不带 /min 后缀。
11. 工具箱快捷按钮
星球卡片右侧边缘有个圆形「妙」字按钮(原生按钮克隆,带悬停提示和点击音效),点击开关工具箱窗口。不想显示可以在 cfg 里关。
12. 传送带定高(Alt+C)
拉传送带时按 Alt+C 打开高度输入框,输入高度后点「应用」(或回车),整条带子精确抬到这个高度。
- 支持小数点后 4 位,按输入精确生效、不取整到层——输入 3.63 就是恰好 3.63 格。
- 单位可以选「格」或「米」(1 格 = 1.3333 米),输入时也可以加后缀临时切:
4格/4c= 4 格,5m= 5 米。 - 再按一次 Alt+C(或 Esc)关闭输入框;解除定高 = 输入 0 后点应用,或者退出建造时自动解除恢复贴地。
- 定高生效期间原版的传送带高度增减键被接管;解除后照常可用。
- 窗口打开期间在输入框里打字不会误触游戏键位。
13. 拉传送带时按住 Shift 保持高度
拉带过程中按住 Shift 不松,整条带子保持在起点的高度水平延伸(不随地形起伏),松开恢复原版。读的是物理键盘状态,窗口切出去看攻略、输入法打断都不会让保持突然失效。和定高功能自动互让:定高生效时 Shift 保持高度让位,松开 Shift 后定高继续。
14. 悬浮传送带(Alt+V)【重制版】
手持传送带,鼠标悬停在任意一格传送带上按 Alt+V,弹出设置窗口——只设置当前悬停传送带的 Z 轴(不动 XY),输入目标 Z 层数后点生成(或回车),在悬停那格传送带的正上/下方生成一格同向传送带,立即完工。
- 输入 = 目标 Z 层数,0 层 = 悬停带正下方的地基面/地面:公式与游戏拉带提示的「建造高度」显示完全同口径(不含 0.2 米实体基准)。悬停贴地带(0 层)输入 3.63 → 生成后建造高度显示 3.63(无 0.15 偏差);输入 -0.5 → 地基面下方 0.5(可埋地做隐藏走线)。正负不限、不做任何贴地钳制。
- 生成手持等级的传送带:手持 1 级带就生成 1 级、手持 2 级就生成 2 级,以此类推(与悬停带的型号无关)。窗口里会显示当前手持的等级。
- 完全免料:不检查、不消耗背包和物流清单里的任何物品,直接生成。
- 仅保留防输入离谱的兜底(半径不小于星球半径 20%)。
- 窗口显示悬停带的离地层数(与建造高度同口径)和海平面 Z 作参考,行尾带版本号(用来核对游戏实际加载的 DLL 版本);生成后的提示报实际建成的离地层数(与建造高度同值,可直接对照验收)。
- 高度可以微调到小数,用来做高低分层输送带、跨带桥接都很方便。
15. 建造秒完成(Alt+B 开关,默认开)
开启后:缺料的待建建筑(蓝图粘贴出来的白影)会自动从背包补料,凑齐立即建成;手动放置或粘贴时已经付了料的建筑直接完工,不再等无人机过来。每 6 tick 分片扫描一轮,大基地也不卡。
如果装了 starfi5h 的 DeliverySlotsTweaks,本模组会自动接管其 GetItemCount/TakeItem 静态替换,建造师模式和秒完成照样工作,不会出现「点击建造栏仍提示物品不足」的问题。
16. 建造师模式(免费建造)
开启后背包数量判定被接管为 888:建造不消耗物品、背包为空也能建,底部建造栏的数量恒显示 888。和秒完成是两个独立开关——建造师管「免费」,秒完成管「速度快」。
17. 传送带切割(Alt+X)
鼠标悬停在某节传送带上按 Alt+X,断开它与下游传送带的连接。传送带本体保留、不掉落物品,用来把一条长带截成两段独立运转。
18. 一键填埋/恢复矿脉(Ctrl+Shift+M)
第一次按:整星掩埋全部矿脉(复用游戏沙盒的原生「改造整星」机制,不消耗地基);第二次按:恢复矿脉,资源储量不变。装了独立版 PlanetVeinBurier 的话本功能自动休眠,不会冲突。
19. 分拣器伸入(按住 LeftCtrl)
注意!此功能无法保存合法蓝图!也可以理解为毫无意义的功能!主要是我为了查看每种建筑加了爪子后的模型大小关系。
拉爪子(分拣器)连接到建筑时按住 LeftCtrl:整个爪子沿「从底座指向建筑」的方向向建筑滑动 0.27 格(cfg 可调),头充分伸进建筑端口、连接视觉到位。松开按键恢复原版位置。
20. 星球透视 + 地下建筑清理
星球透视(默认 Ctrl+Shift+X 开关):隐藏星球的地表地形网格,让你直接看到地表下面的矿脉、地基、建筑底部与下层结构(建筑/矿脉模型保持可见)。可选同时隐藏地基改造层、水面(看海底)、大气层、云层(cfg 控制)。只切换渲染器显隐,不改地形数据、不影响存档;透视时自动延长鼠标拾取射线(原版 480 → 6000),整星视角也能点选地下建筑。
地下建筑清理(默认按住 Alt+Y + 左键点击):透视开启时按住快捷键左键点击屏幕,弹出原版确认框,确认后一键删除地基面以下的全部建筑(原独立版判 -1 层;工具箱版默认判 -2.1 层,约 2.8 米,避免误删贴地建筑)。
- 判定层数可在工具箱 UI 调节:「快捷键修改」页「地下建筑清理(按住)」行下方的「地下清理判定层数」输入框(负数 = 地面以下,0 层 = 地基面/地面,1 层 = 1.333333 米;范围 -0.05 ~ -100),应用后写 cfg 立即生效。
- 两条快捷键都能在「快捷键修改」页修改。
- 删除走原版拆除管线(RemoveEntityWithComponents),自动清理传送带网络/分拣器/电力等引用;物品返还可选(cfg「删除时返还物品」)。
- 仅对所在行星生效;若安装了独立版 DSPHideSurface,工具箱内置功能自动休眠,二者留一即可。
21. 批量拿取传送带货物(按住 Shift+Ctrl + 左键点击)
空手时按住 LeftShift + LeftCtrl,鼠标左键点击一条传送带——一次性拿取被点击传送带上的全部货物,然后沿运输链一路往上游清过去,把沿途货物全都收进背包(带原版拾取计数弹窗)。
- 两条上游边都递归:传送带自己的输入连接(直连的上游带、汇入的左右输入带),以及分拣器(爪子)的拾取端——爪子从哪条带拾取,那条带连同它的全部上游链一起清。爪子上正夹着的在途货物也一并拿走。
- 整个遍历升级为「传送带 + 爪子」完整运输图洪填,上限 2000 条防环形链死循环。
- 只在空手时触发(手持建造物品时点击不响应,不会干扰正常建造/拉带);打字与鼠标在 UI 上时同样不触发。
- 走原版拿取管线(CargoTraffic.PickupBeltItems + TryAddItemToPackage),自动清理带面货物引用,增产插件加成照常生效。
- 开关、修饰键(默认 LeftShift + LeftControl)、是否含爪子货物、是否含上游链、遍历上限都可在 cfg(DSPBlueprintOffset.cfg「拿取传送带货物/BeltGrab」)里调。
快捷键一览
| 快捷键 | 功能 | 默认 |
|---|---|---|
| F9 | 传送带间距 开/关 | 开 |
| Alt+5 | 工具箱窗口 开/关 | 关 |
| Alt+W | 无碰撞摆放 开/关 | 关 |
| Alt+A | 隐藏建筑模型 三态循环 | 显示 |
| Alt+N | 星球指北针 开/关 | 开 |
| Alt+M | 统计信息显示 开/关 | 开 |
| Alt+B | 建造秒完成 开/关 | 开 |
| Alt+U | 蓝图回归线自由摆放 开/关 | 关 |
| Ctrl+Shift+K | 悬停坐标 开/关 | 关 |
| Ctrl+Shift+N | 蓝图拖拽碰撞对齐 开/关 | 关 |
| Ctrl+Shift+M | 一键填埋/恢复矿脉 | — |
| Alt+X | 传送带切割 | — |
| Alt+V | 悬浮传送带(建造模式) | — |
| Alt+V | 蓝图快速偏移/线性变换输出(蓝图框选模式) | — |
| Alt+C | 传送带定高输入框 | — |
| 按住 LeftCtrl | 分拣器伸入 | 开 |
| 拉带时按住 Shift | 保持当前高度 | 开 |
| Ctrl+Shift+X | 星球透视开关 | 关 |
| 按住 Alt+Y + 左键 | 地下建筑清理(透视时) | — |
| 按住 Shift+Ctrl + 左键 | 批量拿取传送带货物(含爪子链+上游) | — |
所有快捷键都能在游戏内「快捷键修改」页改(格式:键名用 KeyCode 枚举名,+ 分隔,顺序随意,例如 LeftAlt + N、K + LeftShift + LeftControl),改完立即生效并写回 cfg。
配置文件
各功能的 cfg 保持原模组的位置与文件名:
BepInEx/config/TropicBeltSpacing.cfg—— 间距相关的所有细项(蓝图安全、垂直抽稀、远距延伸、强制连接、日志等)BepInEx/plugins/DSPMiaoToolbox/DSPBlueprintOffset.cfg—— 蓝图工具箱、统计信息显示、指北针、无碰撞、隐藏建筑、秒完成、星球透视/地下清理、批量拿取等合并版新增功能BepInEx/config/dsh.hovercoord.cfg—— 悬停坐标BepInEx/plugins/DSPMiaoToolbox/DSPBPColliderSnap.cfg—— 蓝图拖拽碰撞对齐BepInEx/config/BPTropicFree.cfg—— 回归线自由摆放
r2modman 的 Config editor 可以直接编辑 2 号和 4 号(在 DSPMiaoToolbox 模组目录下)。统计范围、时间档、各快捷键、地下清理判定层数也可以直接在游戏内悬浮显示和「快捷键修改」页改,效果与改 cfg 完全相同。
兼容性
- 与 LongerBelts 等改传送带路径的模组兼容(间距逻辑会自动接管其路径生成,可用
UseVanillaGridPath关闭接管)。 - 与 DeliverySlotsTweaks 兼容:自动接管其背包替换,建造师模式/秒完成正常工作。
- 装了独立版 PlanetVeinBurier 时,内置的一键填埋功能自动休眠。
- 装了独立版 DSPHideSurface 时,内置的星球透视/地下清理功能自动休眠(二者留一即可)。
- 合并模组的补丁目标互不重叠,合并后行为与分开安装完全一致。
- 与 NebulaMultiplayerMod 有兼容问题,联机会导致数据不同步。
从源码构建
powershell -ExecutionPolicy Bypass -File .\build.ps1 -Zip
# 可选参数:
#   -GameDir "X:\...\Dyson Sphere Program"
#   -BepInExCore "X:\...\BepInEx\core"
已知的小事项
- 统计信息显示在飞离星球(太空/星系视图)时仍会显示,此时如果范围选的是「当前星球」会自动按统计全星区兜底,落回星球后恢复。
- 无碰撞摆放会保留游戏对「物流运输站相隔太近」的判定:即便开启无碰撞,物流站间距过近时依然会被拦截(TowerTooClose 检查保留)。
- 蓝图安全模式的间距模式下,如果拉带距离特别短且不在整数格上,会强制直连一节短带(可在 cfg 关闭 ForceConnectTooClose,改为直接失败)。
- 隐藏建筑模型后,被隐藏的建筑不可被鼠标选中是刻意设计(方便点击被挡住的设施)。
- 机甲无碰撞开启时会顺带能穿过敌人(玩家和实心建筑同在碰撞层 12,Unity 层级机制所限)。
🌐 English(click to expand)
English
Hi there
I'm MiaoMiaoOnTheRoad (Douyin@MiaoMiaoOnTheRoad), a Dyson Sphere Program player obsessed with extreme-dense blueprint layouts.
This toolbox had no grand ambitions at first: several small mods had overlapping features and configs scattered everywhere, so I merged them into a single DLL to keep things manageable. Then the "wouldn't it be nice if this were a little smoother" moments kept piling up during play, and I just kept writing them in — that's how it grew into this all-in-one pack: belt spacing, blueprint toolbox, drag alignment, free placement across tropics, hover coordinates, no-collision placement, hide buildings, planet compass, stats overlay, precise belt height, hover belt, instant build, builder mode, belt cutter, vein burier, sorter advance, planet x-ray, underground cleaner, and belt cargo grab — all in one package.
If this mod helps you, please follow me on Douyin! ❤❤❤❤❤ Some ideas were borrowed from great modders like Soar and Shi Sang — many thanks to them all! The UI follows the game language (Chinese/English). Requires BepInEx 5.4.17.
All feature toggles and hotkeys live in the in-game "Miao Blueprint Toolbox" window (Alt+5). Changes apply instantly and are written back to each module's cfg file — no game restart needed. Some buttons are colour-coded for readability — no misclicks while running repetitive belt routes :)
Recent updates
- "Remove station material lock" is fixed: when clearing the keep-stock flag, the old code reached too far and also wiped the stations' input/output port configuration — pasted stations would lose their belt output (that "why do some towers have no output" bug). Now it only clears the keep flag; ports, output settings and logistics modes are all preserved. If you generated unlocked blueprints with the old version, regenerate them from the original — port config in the old results is already damaged and can't be recovered.
- Smarter belt cargo grab: Shift+Ctrl+left-click a belt to sweep the entire upstream chain into your inventory — now including cargo currently clamped in sorters, plus the whole chain feeding each sorter's pickup end. One click clears a whole line end to end.
- Alt+V quick output in blueprint mode: after box-selecting buildings, Alt+V opens one dialog for "scale/rotate + translate" — Enter applies it and jumps straight into paste mode, like vanilla's Use-Now but with transforms. No more detour through the Alt+5 panel to slant a row of assemblers along a tropic.
- A round of fixes for the belt trio: Shift-hold height no longer dies when the game window loses focus (now reads physical keyboard state); the uneven-interval corner-segment issue was fixed at the game's internal climb logic; and the silently-OFF spacing state is now visible — a master toggle in the toolbox plus a throttled reminder when you pull belts while it's off.
Install
Import this package with r2modman / Thunderstore Mod Manager, or drop the whole BepInEx/plugins/DSPMiaoToolbox/ folder into the game's BepInEx/plugins/.
It is recommended to remove the old standalone mods (TropicBeltSpacing, DSPBlueprintOffset, DSPHideSurface, etc.) first — duplicates won't crash anything, but there is no point running both (with standalone DSPHideSurface / PlanetVeinBurier installed, the matching built-in features sleep automatically). On first run, DSPBlueprintOffset and DSPBPColliderSnap automatically migrate configs from the old mod folders, so previously customized hotkeys are kept.
To update, just overwrite the DLL. All cfg files are backward compatible; migrations run automatically (hotkey splits, default changes, etc.) and never overwrite keys you customized yourself.
Features, one by one
Each entry below covers: what it does, how to use it, the default hotkey, and what can be tuned.
1. Belt spacing (toggle with F9) Automatically enlarges belt node spacing while pulling belts — fewer belts for the same distance, saving materials and buildings.
- Default "free spacing" mode: 1.6–1.8 local grids per segment, each ≤ √5.3 m (2.302 m — the vanilla hard limit minus a 3 cm margin), so blueprints built this way can still be rebuilt in vanilla.
- "Blueprint-safe (integer grid)" mode: strictly vanilla integer-grid nodes only, all spacing in whole grids — for players who want pixel-perfect legal blueprints. Enable via
BlueprintSafein the cfg. - Climbs handled automatically: horizontal spacing shrinks on climbs so 2-grid segments don't hit the TooFar check.
- Vertical thinning (default on): when pulling belts upward, the height difference is split into segments of at most 1.45 grids, each using the game's "direct connect" mechanic — material-saving and clean. Works on slopes too.
- Long reach (default on): vanilla grid walking caps at 256 points (~322 m at 1-grid spacing) and very long belts simply can't be pulled. With this on, over-long belts keep extending at the current spacing up to ~580 m, with the end node landing exactly on target.
- Force connect (default on): when both belt ends land inside the same grid (< 1 grid apart), vanilla absolutely refuses to connect — this builds a short belt to join them anyway; double-tapping R while pulling does something similar.
- F9 toggles all spacing logic at once, and the toolbox "Hotkeys & Toggles" tab has the same master toggle (always in sync). Fine knobs in the cfg: SkipClimb, SkipVertical (hand special terrain to vanilla), LogSpacing (logging), etc. When spacing is OFF, pulling a belt shows a throttled reminder (max once per 10 minutes) so you never wonder why it's off.
2. Blueprint toolbox (Alt+5 toggles the window) Opens the "Miao Blueprint Toolbox" window with the blueprint transform tools. Two tabs: "Tools" and "Hotkeys & Toggles".
Offset: translate the whole blueprint along X/Y/Z. Input boxes accept 4 decimals and operations stack (the net offset is tracked). Every operation can be undone with one click via "restore to loaded state".
Stack: copies the blueprint into multiple layers along Z; layers are not interconnected. Layer count and per-layer gap are yours to fill.
Linear transform: scale on all three axes + rotate around the vertical axis, with anchor presets (centre, first building, etc.). Combined with free tropic placement, this is how you line up a row of assemblers hugging the equator.
Remove station material lock: stations saved from sandbox mode with "keep stock" enabled carry that flag inside the blueprint, and pasting into a normal save leaves the lock stuck on. This button clears the keep-stock flag from every logistics station in the blueprint — only that flag; ports, output settings and logistics modes are all left untouched. Remember to click "write back to clipboard" afterwards.
Number input correction: the input boxes are very forgiving of Chinese IME artefacts — full-width digits, CJK periods, accidental double dots (0..25), zero-width characters pasted in from elsewhere — all auto-corrected. When truly unparseable, it tells you which box failed and what the raw text was.
Connector repair: after offset/stack, belt and sorter connections are repaired automatically — duplicate belt segments deduped, opened gaps of 2–4 straight grids refilled, sorters whose span is no longer a 1–3-grid straight line removed. The building cap is also unlocked from the vanilla 255 to 15000.
Write back to clipboard: after editing, click this button and the blueprint is written back to the clipboard in its new state — paste it in game and you get the edited version.
3. Quick blueprint offset output (Alt+V in blueprint mode)
After box-selecting buildings in blueprint mode, Alt+V opens one dialog — output order: scale/rotate around the anchor first, then translate along X/Y/Z (grids):
- Three input rows: translate X/Y/Z (grids, 4 decimals), scale X/Y/Z (multiplier, 1 = unchanged), rotation (degrees, positive = counter-clockwise).
- Anchors are selectable: X-scale anchor (leftmost/centre/rightmost), Y-scale & rotation anchor (bounding-box centre/left-mid/right-mid/origin), rotation direction × building facing (four choices).
- One "Output Blueprint" button does it all: writes the transforms into the current selection and jumps straight into paste mode — vanilla's Use-Now with all transforms applied. Translate only = pure offset output; scale/rotate only = pure transform output; all defaults = quick as-is output.
- Esc cancels; the hotkey is editable on the "Hotkeys & Toggles" tab (default LeftAlt + V). Note: this Alt+V only fires in blueprint box-select mode — in build mode Alt+V is still "hover belt", the two never fight.
- Out-of-range Z rolls everything back with a message instead of leaving a half-edited blueprint.
4. Blueprint drag collider alignment (Ctrl+Shift+N toggles)
When dragging pasted blueprints, layout fits by the real collider corner spans of the whole group instead of ignoring the ground grid and leaving gaps or overlaps between buildings. Dropping near existing buildings magnet-snaps to their collider edges. The drag-copy cap is unlocked to 15000 — default 99; very large counts will tank your FPS!
5. Hover coordinates (Ctrl+Shift+K toggles, default off) While hovering a building it shows: current latitude/longitude, X/Y/Z axis distances to the building, model volume, and nearest collider distance. For same-type towers (wind turbines, storage towers, etc.) it also shows the distance to the nearest same-type collider — very handy for aligning spacing.
6. Free placement across tropics (Alt+U toggles, default off) When pasting, ignores the tropic (latitude 45–48) placement restriction and foundation platform bounds; the blueprint follows the cursor continuously without teleporting. It also applies uniform rigid placement that locks the blueprint's physical size — east-west grid pitch is compensated by 1/cos(latitude) (spherical meridian convergence), so it never deforms or collides at any latitude, with zero jitter across tropic lines. Off by default because it changes vanilla placement rules quite aggressively — Alt+U when you need it.
7. No-collision placement (Alt+W toggles) While on, buildings ignore collider volumes and can overlap; the mecha walks through buildings too. Blueprint pasting also bypasses collision checks. Manual placement only bypasses when collision is the ONLY failure — missing items or range errors are still blocked normally.
8. Hide building models (Alt+A, 3-state cycle) First press hides all building models, second press also hides sorters, third shows everything again. While hidden, belts, veins, vegetation and blueprint ghosts stay visible, and hidden buildings cannot be picked with the mouse (raycast filtered) — they never block your clicks. Persists across planet changes.
9. Planet compass (Alt+N toggles, default on) Purple N + arrow on the planet card at the bottom left, rotating in real time to point at the planet's north pole. The main purpose of this feature is to show at a glance whether an offset is + or −. A debug mode also overlays P/+Y/-Y markers on the minimap for calibration.
10. Stats overlay (Alt+M toggles, default on) Made for watching detailed info of intermediate products while building blueprints — the current version can monitor up to 15 materials at once in a single column. Filtering follows the ★ favourites in the statistics panel. Kill statistics are supported too (some dark-fog farms may want this).
The live overlay above the planet card, top to bottom:
- Time filter (top row): 1 min / 10 min / 1 h / 10 h / 100 h / Total — six levels matching the panel's time box.
- Scope filter: all galaxy / local planet / each system / each planet... — options are live-synced with the statistics panel's scope dropdown; choosing here directly switches the panel's scope, and the two always agree. Away from a planet with "local planet" selected, it automatically falls back to all-galaxy for display.
- Power gen (cyan) and power load (orange): same metrics as the statistics panel. Load is what the grid actually delivered right now, so shortages show up honestly.
- Favourites column: items starred (★) in the statistics panel show here — a single column, one row per item: icon + production + consumption, exactly the same numbers as the panel row, up to 15 items. Enemies starred on the kill page (Gun Rider, Marauder, etc.) show as enemy icon + kill count. Items sorted by production+consumption descending, kills by kill count descending. Numbers carry no /min suffix; with no favourite filter selected in the panel, all starred entries show.
11. Toolbox quick button A round 妙 button on the right edge of the planet card (native button clone with hover tip and click sound) toggles the toolbox window. Can be disabled in the cfg.
12. Precise belt height (Alt+C) While pulling a belt, Alt+C opens a height input box; type a height and click Apply (or press Enter) — the whole belt is lifted to exactly that height.
- Up to 4 decimals, applied exactly as typed — no rounding to layers. 3.63 means exactly 3.63 grids.
- Units: "grid" or "meters" (1 grid = 1.3333 m); type a suffix to switch on the fly:
4格/4c= 4 grids,5m= 5 m. - Alt+C again (or Esc) closes the box; enter 0 and apply to return belts to the ground, or exit build mode to disarm automatically.
- While armed, the vanilla belt height keys are taken over; disarm restores them.
- Typing in the input box never leaks keystrokes to game hotkeys.
13. Hold Shift while pulling belts to keep height Hold Shift during the pull and the whole belt stays at the starting height (flat, ignoring terrain); release to return to vanilla. It reads the physical keyboard state, so alt-tabbing for a wiki check or an IME interruption won't silently kill the hold. Cooperates with precise belt height: when belt height is armed, Shift-hold yields, and resumes after.
14. Hover belt (Alt+V) [remake] Hold a belt, hover over any belt cell and press Alt+V: a settings window opens — it only sets the Z axis of the hovered belt (XY untouched). Enter the target Z layer count and click Build (or press Enter): one same-direction belt is generated above/below the hovered cell and finishes instantly.
- Input = target Z layers, with 0 = the foundation/ground surface right under the hovered belt — the formula matches the game's "build height" tip exactly (no 0.2 m entity-base offset). Hovering a ground-level belt and typing 3.63 → the belt reads exactly 3.63 in build height (no 0.15 error); typing -0.5 puts it 0.5 below the foundation (hidden routing allowed). Positive or negative, no clamping.
- Builds the tier you hold: holding a mk I belt builds mk I, holding mk II builds mk II, and so on (independent of the hovered belt's tier). The window shows the tier currently in hand.
- Completely free: no items are checked or consumed from the inventory or logistics list — it simply builds.
- The only safeguard is a degenerate-input floor (radius ≥ 20% of the planet radius).
- The window shows the hovered belt's above-ground layers (same convention as build height) and sea-level Z for reference, plus a version tag to verify which DLL the game actually loaded; the result tip reports the actual built above-ground layers (same value build height shows, for direct verification).
- Offsets accept decimals — handy for layered conveyors and bridging over belts.
15. Instant build (Alt+B toggles, default on) When on: under-fed ghosts (e.g. from pasted blueprints) automatically pull the missing items from your inventory and finish as soon as they're complete; manually placed or pasted buildings that were already paid for finish immediately without waiting for drones. Scans in shards every 6 ticks so even huge bases stay smooth.
If starfi5h's DeliverySlotsTweaks is installed, this mod automatically takes over its GetItemCount/TakeItem static replacements, so builder mode and instant build keep working — no more "not enough items" when clicking the build bar.
16. Builder mode (free building) When on, inventory count checks are taken over as 888: building costs nothing and works with an empty inventory, and the build bar always shows 888. Separate from instant build — builder mode handles "free", instant build handles "fast".
17. Belt cutter (Alt+X) Hover over a belt segment and press Alt+X to disconnect it from the downstream belt. The segment itself stays and no items drop — useful to split one long belt into two independent runs.
18. Vein burier / restore (Ctrl+Shift+M) First press buries all veins on the planet (reusing the sandbox's native "reform planet" mechanic, no foundations consumed); second press restores them with reserves unchanged. Automatically sleeps if the standalone PlanetVeinBurier mod is installed.
19. Sorter advance (hold LeftCtrl) Note! Belts placed this way cannot be saved as a legal blueprint — honestly, it is a niche feature I added mainly to inspect model size relationships with sorters attached.
While connecting a sorter to a building, holding LeftCtrl slides the whole sorter (base + head) 0.27 grid toward the building (configurable) so the head properly reaches into the port. Release to restore.
20. Planet x-ray + underground cleaner Planet x-ray (default Ctrl+Shift+X toggle): hides the planet's surface terrain mesh so you can directly see veins, foundations, building bases and lower structures under the surface (buildings/veins stay visible). Optionally hides the terrain reform layer, ocean (see underwater), atmosphere and clouds (via cfg). It only toggles renderer visibility — no terrain data is changed, saves unaffected; while x-ray is on the mouse pickup ray is automatically extended (vanilla 480 → 6000) so underground buildings can be clicked from a whole-planet view.
Underground cleaner (hold Alt+Y + left-click by default): with x-ray on, hold the hotkey and left-click the screen — a vanilla confirmation box pops up, and confirming deletes all buildings below the foundation surface (the standalone mod judged at layer -1; the toolbox version defaults to layer -2.1, ≈2.8 m, to avoid deleting near-surface buildings by mistake).
- The depth is adjustable in the toolbox UI: on the "Hotkeys & Toggles" page, the "underground clean depth" box right under the "underground cleaner (hold)" hotkey row (negative = below ground, 0 = foundation/ground surface, 1 layer = 1.333333 m; range -0.05 ~ -100). Applying writes the cfg and takes effect immediately.
- Both hotkeys are editable on the same page.
- Deletion uses the vanilla removal pipeline (RemoveEntityWithComponents) which cleans belt networks / sorters / power references; item refund is optional (cfg).
- Only works on the planet you are on. If the standalone DSPHideSurface is installed, the built-in feature sleeps automatically — keep either one.
21. Belt cargo grab (hold Shift+Ctrl + left-click) With an empty hand, hold LeftShift + LeftCtrl and left-click a belt: all cargo on the clicked belt is picked up at once, then the whole transport chain is swept upstream — everything along the way goes straight into your inventory with the vanilla pickup popups.
- Both upstream edges are followed: the belt's own input connections (direct upstream plus side inputs), and sorter pickup ends — whatever a sorter picks from, that belt and its whole upstream chain get cleared too. Cargo currently clamped in a sorter is grabbed as well.
- The whole walk upgraded to a full "belts + sorters" transport-graph flood fill, capped at 2000 belts as a runaway-loop safeguard.
- Only triggers with an empty hand (clicking while holding a build item is left alone, so normal building/pulling is never disturbed); also skipped while typing or when the cursor is over UI.
- Uses the vanilla pickup pipeline (CargoTraffic.PickupBeltItems + TryAddItemToPackage): belt-cargo references are cleaned and proliferation bonuses apply as usual.
- Toggle, modifier keys (default LeftShift + LeftControl), include-sorter-cargo, include-upstream and the walk cap are all configurable in the cfg (DSPBlueprintOffset.cfg, "拿取传送带货物/BeltGrab").
Hotkeys
| Hotkey | Function | Default |
|---|---|---|
| F9 | Belt spacing on/off | on |
| Alt+5 | Toolbox window | off |
| Alt+W | No-collision placement | off |
| Alt+A | Hide building models (3-state) | shown |
| Alt+N | Planet compass | on |
| Alt+M | Stats overlay | on |
| Alt+B | Instant build | on |
| Alt+U | Free placement across tropics | off |
| Ctrl+Shift+K | Hover coordinates | off |
| Ctrl+Shift+N | Blueprint drag collider alignment | off |
| Ctrl+Shift+M | Vein burier / restore | — |
| Alt+X | Belt cutter | — |
| Alt+V | Hover belt (build mode) | — |
| Alt+V | Quick blueprint offset/transform output (blueprint mode) | — |
| Alt+C | Belt height input | — |
| Hold LeftCtrl | Sorter advance | on |
| Hold Shift (pulling) | Keep belt height | on |
| Ctrl+Shift+X | Planet x-ray toggle | off |
| Hold Alt+Y + left-click | Underground cleaner (x-ray on) | — |
| Hold Shift+Ctrl + left-click | Belt cargo grab (incl. sorter chains + upstream) | — |
Every hotkey can be changed in-game on the "Hotkeys & Toggles" tab (format: KeyCode names joined with +, order free, e.g. LeftAlt + N, K + LeftShift + LeftControl). Changes apply instantly and are written to the cfg files.
Config files
Each feature keeps its original module's cfg location:
BepInEx/config/TropicBeltSpacing.cfg— all belt-spacing fine options (blueprint-safe, vertical thinning, long reach, force connect, logging, etc.)BepInEx/plugins/DSPMiaoToolbox/DSPBlueprintOffset.cfg— toolbox, stats overlay, compass, no-collision, hide buildings, instant build, planet x-ray / underground cleaner, belt cargo grab and the other merged featuresBepInEx/config/dsh.hovercoord.cfg— hover coordinatesBepInEx/plugins/DSPMiaoToolbox/DSPBPColliderSnap.cfg— blueprint drag collider alignmentBepInEx/config/BPTropicFree.cfg— free placement across tropics
r2modman's Config Editor can edit #2 and #4 directly (under the DSPMiaoToolbox mod folder). Scope, time level, hotkeys and the underground-clean depth can also be changed in-game with the same effect.
Compatibility
- Works with LongerBelts and other belt-path mods (spacing logic takes over their path generation;
UseVanillaGridPathdisables the takeover). - Works with DeliverySlotsTweaks: its inventory replacement is taken over so builder mode / instant build keep working.
- Auto-sleeps when the standalone PlanetVeinBurier mod is present.
- Auto-sleeps when the standalone DSPHideSurface mod is present (planet x-ray / underground cleaner).
- The merged modules have non-overlapping patch targets; merged behaviour equals separate installation.
- Known issue with NebulaMultiplayerMod: playing multiplayer together causes data desync.
Build from source
powershell -ExecutionPolicy Bypass -File .\build.ps1 -Zip
# Optional parameters:
#   -GameDir "X:\...\Dyson Sphere Program"
#   -BepInExCore "X:\...\BepInEx\core"
Known notes
- The stats overlay keeps showing in space/system view; if scope is "local planet" it automatically falls back to all-galaxy, and restores when you land.
- No-collision placement preserves the vanilla "logistics stations are too close" check: even with no-collision enabled, stations that are too close together are still blocked (TowerTooClose kept).
- In blueprint-safe spacing mode, very short non-grid-aligned pulls force-connect a short segment (disable ForceConnectTooClose in the cfg to make it fail instead).
- Hidden buildings being un-selectable is intentional (so you can click what was behind them).
- With no-collision on, the mecha also walks through enemies (players and solid buildings share physics layer 12 — a Unity limitation).