
SmartBuild
Place floors, roofs, walls, smelters and more in a 3D grid. Hold X for width, Z for depth, or both for height, then press Up/Down or scroll, or press K to type exact values. Arcs, stagger, follow terrain, undo. Client-side.Smart Build
One swing, a whole wall.
Smart Build places entire layouts in one go, using ordinary pieces at ordinary cost: grids on all three axes, gaps, stagger, arcs, blueprints of things you have already built, terrain following, and an undo that refunds every last nail.


The idea
Vanilla building is one piece, one click, forever. That is fine for a hut and punishing for a longhouse. Smart Build takes the repetitive half off your hands:
- Lay a 10 x 10 longhouse floor in one go instead of a hundred aims and a hundred clicks.
- Run a palisade the length of your border with the spacing set once, not fifty times.
- Bend a wall into an arc, or a full circle, without lining up a single piece by eye.
- Save a section you already built and stamp it down the whole coastline.
- Build across a hillside and let every piece settle onto the ground beneath it.
- Get it wrong, press Ctrl + Z, and walk away with every resource back in your pockets.
It adds no new pieces and makes nothing free. It just swings your hammer faster.
What it will and won't do
Smart Build will not build anything you could not have built yourself. Every piece costs full price, wards and no-build zones and biome rules all still apply, and if one spot in a grid is blocked the whole placement is refused rather than quietly skipping past it. There is no creative mode hiding in here.
It also stays in its own lane. Everything rides on a separate tool you craft, the Smart Hammer, so your plain hammer keeps behaving exactly as it always has. It is client-side, so nobody else on the server needs it, and everything it puts down is an ordinary piece that stays standing if you ever uninstall.
You will probably like it if you are putting up longhouses, curtain walls, docks, terraced farms, or anything else that has ever had you clicking the same piece fifty times in a row.
You probably want something else if you are after free materials, a creative mode, or anything that reaches the other players on your server.
The time it saves
| What you are building | One piece at a time | With Smart Build |
|---|---|---|
| A 10 x 10 longhouse floor (100 pieces) | 100 aims and 100 clicks | a few seconds |
| A row of 20 stone foundations | 20 | a few seconds |
| A 12 x 2 x 2 curved wall (48 pieces) | 48 pieces, each turned by hand | a few seconds, the curve set once |
| A 30 x 10 palisade (300 pieces) | 300 | a few seconds |
| A 1,000-piece build | 1,000 | a few seconds |
Dialling in a size really is just holding X and scrolling. It stays safe at that scale, too: materials are counted before anything spawns, a blocked spot refuses the whole grid, and Ctrl + Z hands it all back.
Core features
Grid on three axes
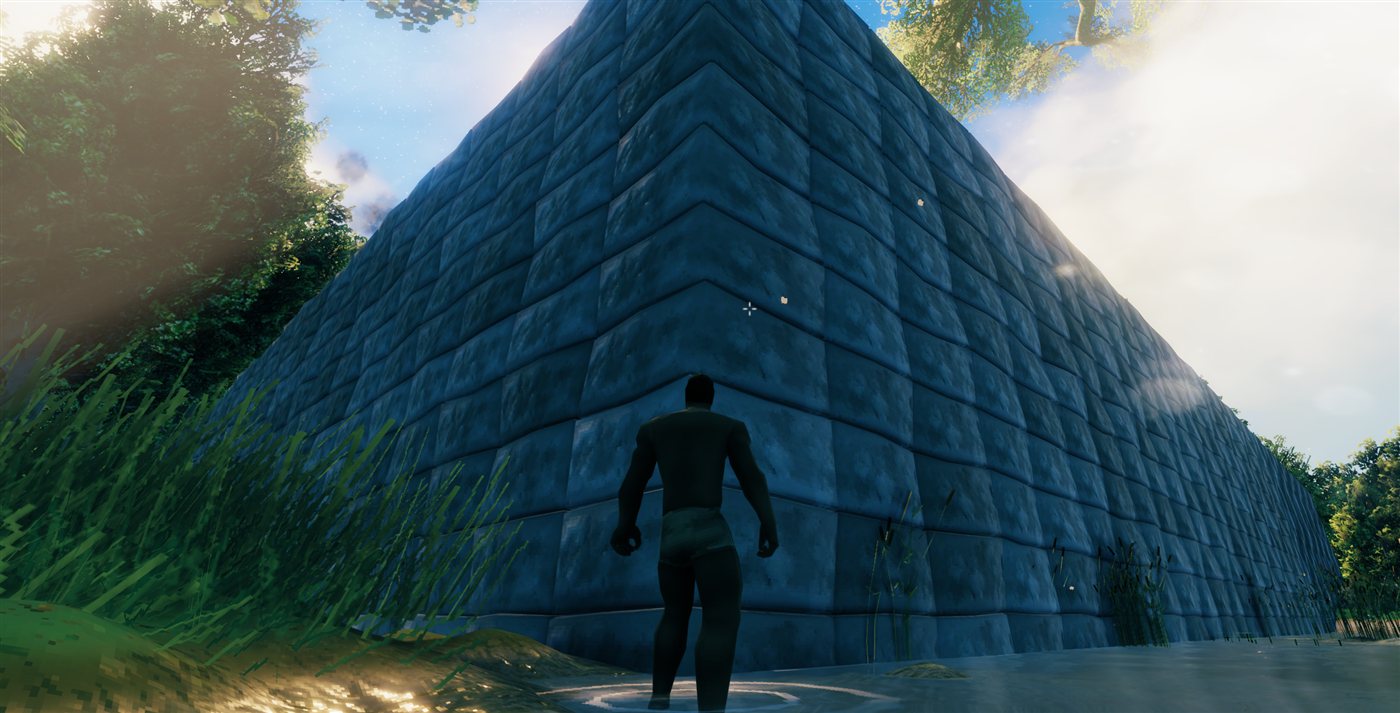
This is the heart of it. Instead of placing one piece, you place a grid of them: a longhouse floor, a curtain wall, a tower of stacked layers.
- Hold X and scroll the mouse wheel (or press the Up / Down arrow keys) for width, Z for depth, X + Z together for height.
- Hold Shift to move in steps of 10.
- Press Down past 1 and the axis flips, growing the other way from the piece you are aiming at.
- Size, gap, piece count, and blocked count all show on screen while you set it up.
Directional arrows
Three short arrows float just above the ghost whenever a grid or blueprint is dialled in, or while you hold X or Z to start one: red for X, green for Y, blue for Z. They point the way each axis grows, so a rotated, staggered, or flipped layout is never a guess. Glance at the arrows, then click.
Gap
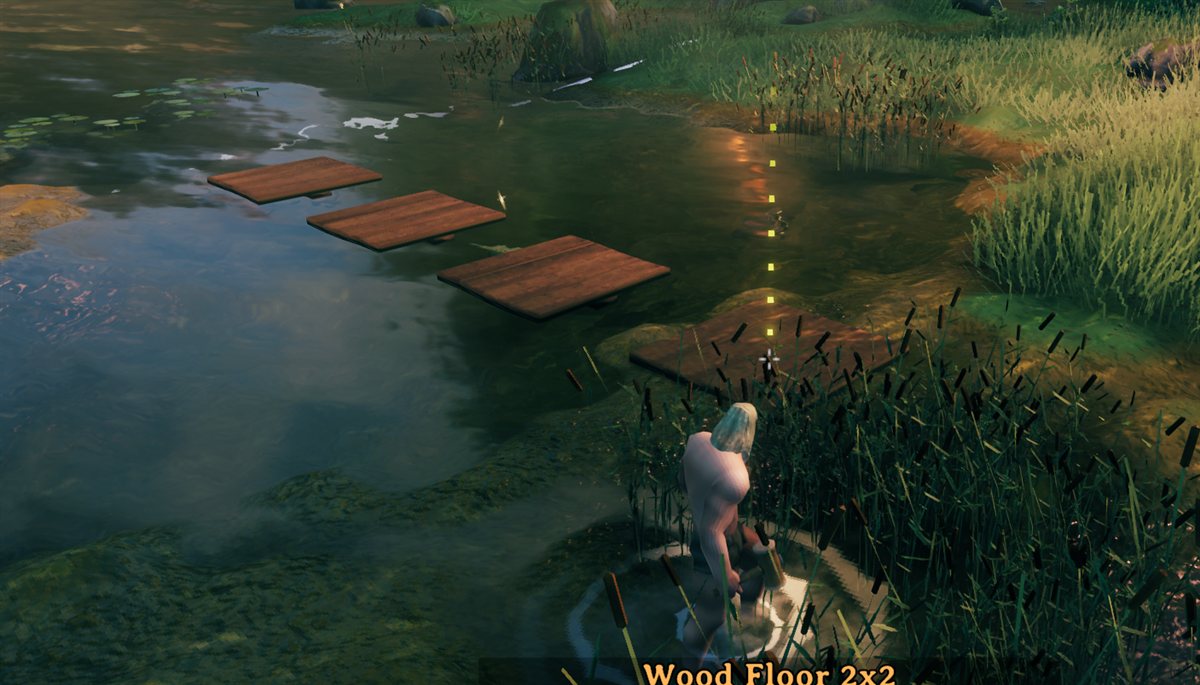
Every axis gets its own gap, so you can spread a row out one way and keep it tight the other. Negative values overlap pieces on purpose.
Stagger
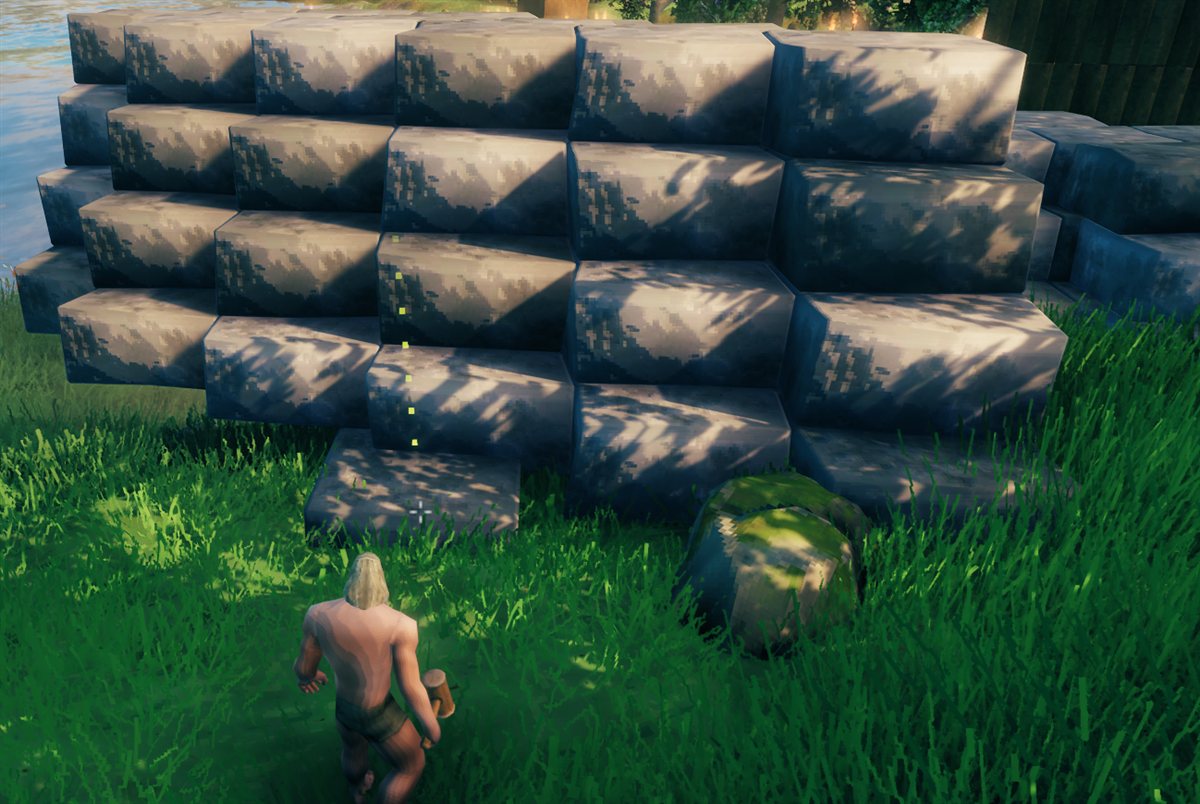
Stagger works in every direction, whichever way the grid runs: each piece shifts a little further than the one before, along either of the other two axes. Hold B with X to shift along X (red), with Z along Z (blue), or with both to step up (green). So a row of walls can step up into a stair of walls, and a stack gridded straight up can step forward into a staircase. The K panel lists all six (each row, column and layer, along its two other directions).
Rotation
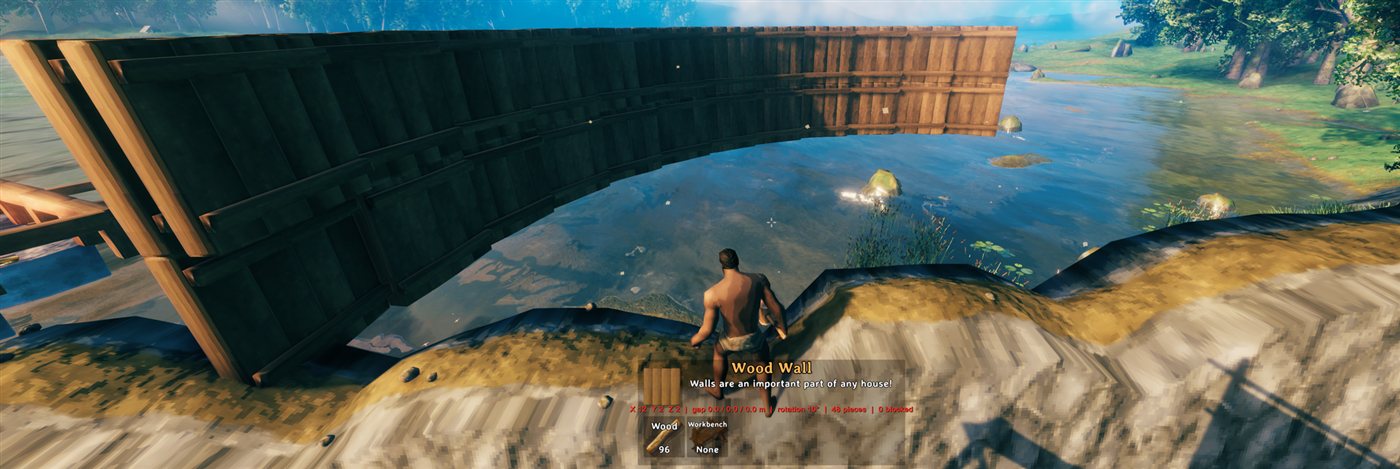
Each piece turns a little more than the one before it, and neighbouring pieces still meet flush end to end. R turns about the vertical (yaw): a straight row bends into an arc, a longer one closes into a circle, a staircase gridded along its depth winds into a spiral, and a stack gridded straight up twists into a tower. Add X to tip each piece about the red X axis (pitch) or Z about the blue Z axis (roll): a row of walls curves up into a dome rib, a stack curves over. Turns combine into a helix, and whichever way the grid runs gets them. Hold Ctrl as well to tilt the whole grid instead - every piece, the first included, and the direction it runs in: a stack that went straight up now climbs at 45 degrees. The K panel lists all of it (yaw, pitch and roll for each column, row and layer, and the whole-grid tilt).
Blueprints
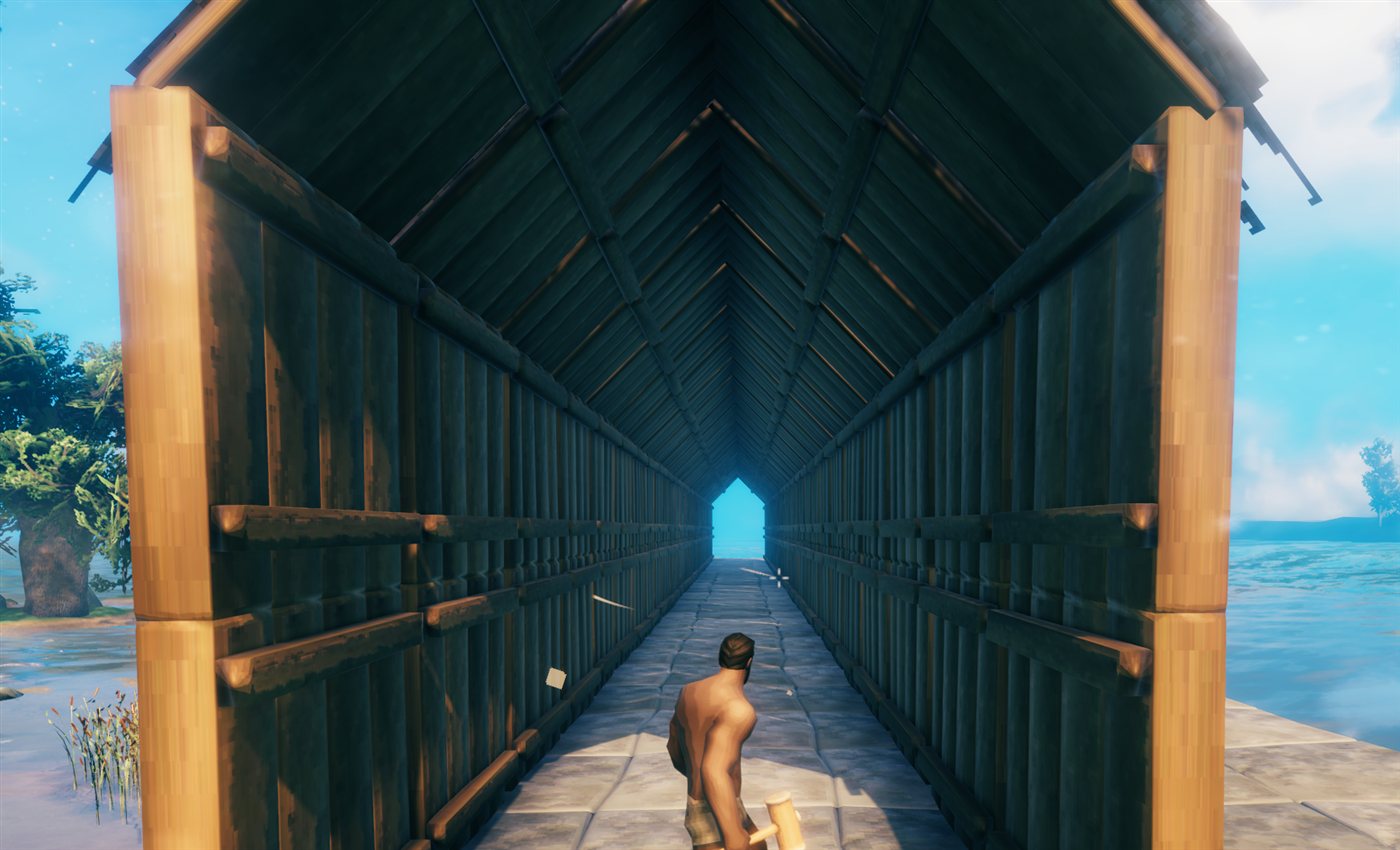
Point at pieces you have already built, press F, and save the lot as a blueprint. It then lives in the build menu like any other piece, and repeats through the same grid controls. That whole tunnel is one blueprint (a floor, walls, and a roof) stamped down a line.
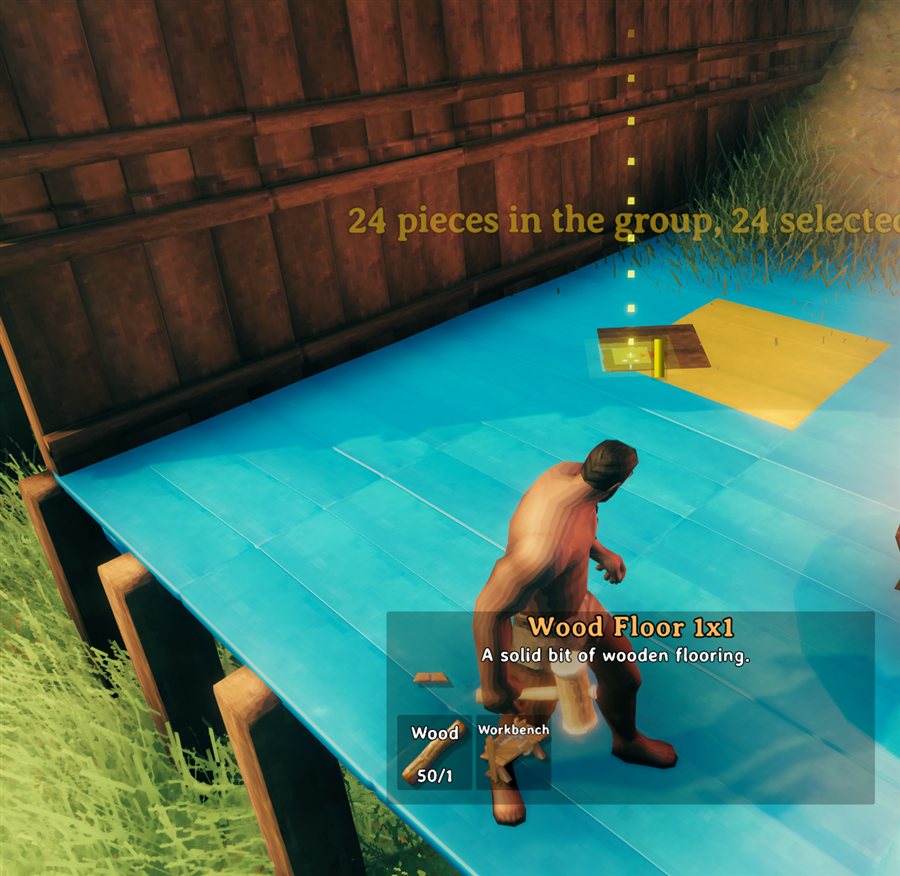
Hold F and sweep the crosshair across pieces to pick up many at once, Shift + F takes everything that was placed together in one go (here, a 24-piece floor), and Alt + F takes a piece and everything connected to it. Selected pieces glow blue; the gold one is the origin the blueprint is measured from.
Follow terrain
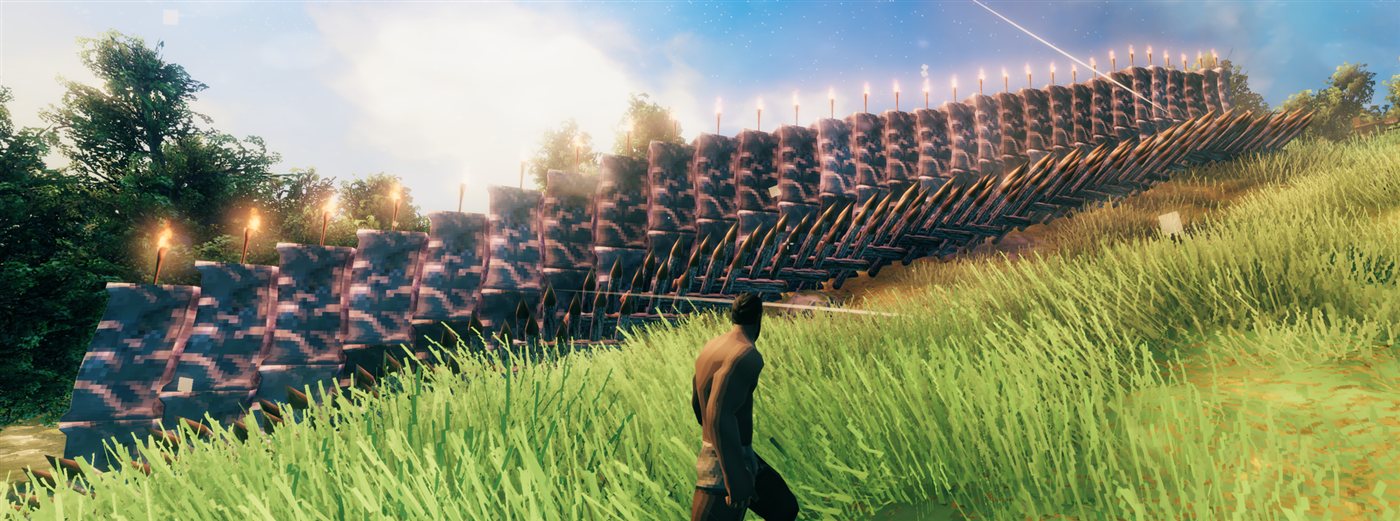
Press L and a grid rises and falls with the ground beneath it instead of staying level with the first piece, so a wall across a hillside hugs the land. A blueprint moves as one piece: that is a single wall-stakes-and-torches blueprint repeated up the slope, and every copy keeps its torches sitting on its own wall.
Hold, nudge, and undo
- Hold (H) freezes a grid or blueprint where it is, so you can walk away and still place it from up to 100 m off (HoldReach), as long as it is in the area the game has loaded.
- Nudge it once it is held, the way Smart! does: the arrow keys slide it forward, back, left and right (relative to where you are looking, but always square to the piece), and PgUp / PgDn raise and lower it. Each press moves it 0.1 m, or 1 m with Shift. Nudging a grid you have not held yet holds it for you.
- Undo (Ctrl + Z) takes back the last grid or blueprint stamp and refunds every material.
Quick start
- Craft the Smart Hammer (1 Wood, no crafting station) and equip it.
- Pick any piece from the build menu so its ghost is showing.
- Hold X and scroll to set the width. Z does depth, X + Z together does height.
- Check the arrows above the ghost, aim, and click. The whole grid goes down at once, cost and blocking checked first.
- Changed your mind? Ctrl + Z.
Every key is rebindable in the Jotunn config.
Controls
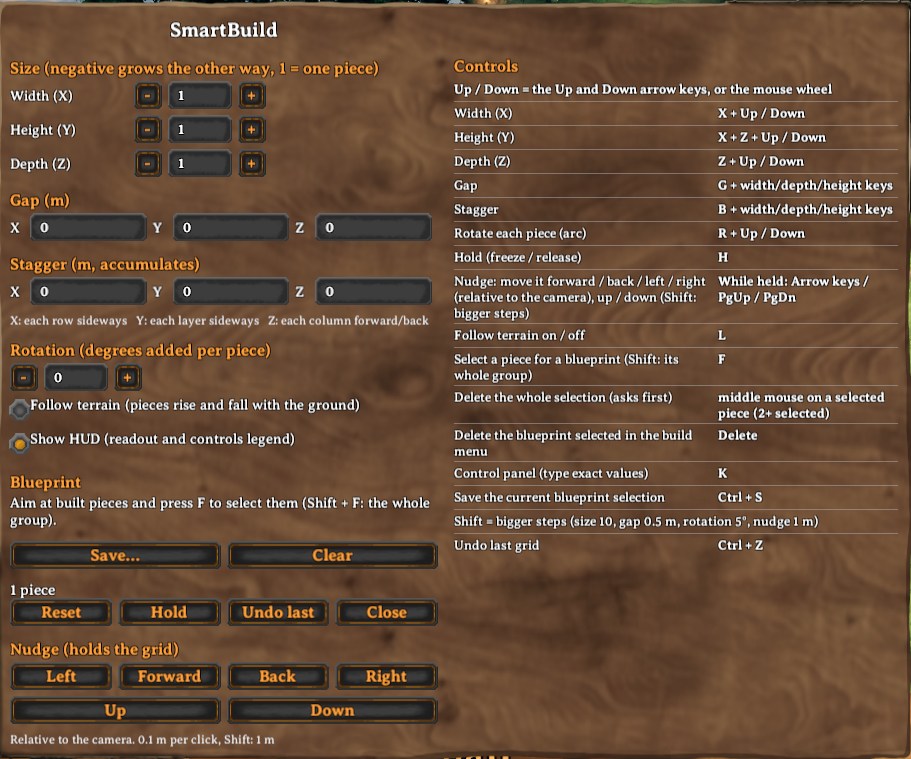
Press K for the control panel: every setting can be typed in exactly or stepped with its buttons, and the right-hand column lists every shortcut, so you can learn them and stop needing the panel at all.
Every key below works only while the Smart Hammer is equipped with a piece ghost showing. The plain hammer is untouched.
| Keys | Action |
|---|---|
| X + Up / Down arrow or mouse wheel | Width (X) +/- (hold Shift for steps of 10). Down from 1 goes to -2 and grows the other way from the piece you aim at (sizes run -2, 1, 2: a single piece is just 1) |
| Z + Up / Down arrow or mouse wheel | Depth (Z) +/- |
| X + Z + Up / Down arrow or mouse wheel | Height (Y) +/-: stacks layers upward, e.g. wall on wall |
| G + the size keys above | Gap on that axis instead of the size (0.1 m per step, Shift: 0.5 m; negative overlaps) |
| B + X, B + Z, B + X + Z | Stagger along X (red), Z (blue) or up (green): each piece shifts a little further than the last, along whichever way the grid runs (0.25 m per press, accumulates) |
| R + Up / Down arrow or mouse wheel | Yaw: turn each piece a bit more than the last about the vertical (0.5 degrees per press, Shift: 5 degrees; both configurable). Bends a row into an arc or circle, winds a staircase into a spiral, twists a stack; pieces meet flush end to end |
| R + X or R + Z, + Up / Down arrow or mouse wheel | Pitch (about red X) or roll (about blue Z) each piece a bit more than the last: curves a row or a stack up, down or sideways. Applies along whichever way the grid runs |
| Ctrl + R (+ X or Z) + Up / Down arrow or mouse wheel | Tilt the whole grid: every piece, the first one included, and the directions the grid runs in, tipped by the same angle (about Y alone, X with X, Z with Z). Per-piece rotation still builds on top |
| H | Hold: freeze the grid or blueprint in place (press again to release); place it from up to 100 m away (HoldReach) |
| Arrows, PgUp / PgDn | Nudge the held grid or blueprint 0.1 m (Shift: 1 m) forward/back/left/right relative to the camera, or up/down; holds it first if it is not held |
| L | Follow terrain on / off: each piece (or each blueprint copy, as a whole) rises and falls with the ground under it. Stays on until you turn it off or switch pieces |
| K | Open the control panel: type exact sizes, gaps, stagger and rotation, or use its - / + buttons; also Reset, Hold, Nudge buttons, Undo, Save/Clear for the current blueprint selection, and a full list of every shortcut. The mouse is freed while it is open |
| F | Add or remove the built piece you are aiming at from the blueprint you are putting together. Hold F and sweep the crosshair to add (or, starting on a selected piece, remove) many at once. Shift + F: its whole group, Alt + F: it and every piece connected to it, no limit. Reaches up to 50 m (SelectReach) |
| Middle mouse on a selected piece | With 2 or more pieces selected, deletes the whole selection after a confirmation ("You are about to delete N pieces"). Each piece is removed as the hammer would remove it (wards and the rest respected), dropping its materials where it stood. On a piece that is not selected, middle mouse removes just that one, reaching up to 50 m with the Smart Hammer (SelectReach) |
| Ctrl + S | Save the current blueprint selection, with a name typed into the game's own naming box |
| Delete | With a saved blueprint selected in the build menu (its ghost showing), delete it |
| Mouse wheel | Rotate the whole grid, as for a single piece (when none of the keys above is held) |
| Ctrl + Z | Undo the last grid or blueprint stamp (refunds materials) |
Up / Down means both the Up / Down arrow keys and the mouse wheel: hold the key, then press an arrow or scroll (scrolling up = Up). While one of those keys is held, the wheel stops rotating the piece and stops zooming the camera.
Other mods binding the same keys (a quick slot on Z, say) will not break these controls. Smart Build reads the keyboard directly, blocks item use while its keys are held, and logs a Key clash warning at start-up naming any mod that shares one. Vanilla's Sit key is X, its holster key is R, and its Guardian Power key is F, so those are held back while you hold the matching key with a piece showing. A key legend sits at the left of the screen and a settings readout at the bottom (hide them with ShowHud in the K panel or config, or ShowControlsHint for just the legend).
The Smart Hammer
Smart Build lives in its own tool. Craft one for 1 Wood, no crafting station needed. It has the same durability and repair as the plain hammer and builds every piece the plain hammer does, including anything another mod adds.
Equip it and you get everything above. Equip the plain hammer (or anything else) and building is exactly vanilla again: no grid, no keys held back, nothing changed.
Blueprints in detail
Aim at a built piece and press F to add it to the blueprint you are putting together. Press F again to drop it, Shift + F to take the whole group it was placed with, or Alt + F to take it and everything connected to it, however far that reaches. Selected pieces glow, and the first one glows gold: that is the origin everything else is measured from.
A selection on its own cannot be gridded, moved, or rotated. It has two exits: press Ctrl + S (or Save... in the K panel) and name it, or hit Clear in the K panel to walk away from it.
Once saved, it appears as its own piece in the build menu under a Blueprints category on the Smart Hammer, showing the icon of whichever piece it uses most so it is easy to pick out. Select it and aim like any other piece. The ghost shows every piece in place and snaps onto nearby builds the same way a single piece does. With it selected, Delete removes it for good.
From there it repeats exactly like a single piece: set a grid size and one click stamps that many copies, with gap, stagger, and rotation all working the same way. That is how the tunnel above gets built. The nearest copies render as real pieces so you can see precisely what you are about to place and which way it faces, while further copies (or a very large blueprint) fall back to a wireframe box. The whole stamp is checked for cost and blocking, then placed at once, and Ctrl + Z refunds it like anything else. The blueprint stays selected afterwards, so the next click drops another one, with the grid dial reset to a single copy so you never repeat a big stamp by accident.
Blueprints are saved as small text files under BepInEx/config/SmartBuild/Blueprints and reload automatically.
Compatibility and save safety
Smart Build is client-side. Servers and other players do not need it.
It places ordinary Valheim pieces and charges ordinary costs, so a save built with it keeps working without it. The one exception is the Smart Hammer itself: a client without the mod cannot load that item, so it is skipped (and lost) the next time that client's inventory saves, and it is invisible to them on the ground. Nothing crashes either way.
Build-from-chest mods (Valheim Plus CraftFromChest, Craft From Containers, AzuCraftyBoxes, and friends) are supported: materials in the chests they can reach count toward a grid, and are spent from them as pieces spawn. Undo always refunds to your inventory.
Rules and limits
- The whole grid must be affordable the moment you click, or it is refused outright.
- If any cell is blocked (terrain or another piece in the way, a ward you lack access to, a no-build zone, the wrong biome), the whole grid is refused.
- Size, gap, rotation, and stagger reset after each placement, when you switch pieces, and when you put the Smart Hammer away. Follow terrain survives placements but clears with the other two.
- A grid is limited to 100 per axis and 100,000 pieces by default. Both are settings, raisable to 1,000 per axis and 1,000,000 pieces. A placement that large takes minutes, runs in the background so you can keep playing, cannot be cancelled, and makes a world heavy, so raise them only if you mean it.
- Pieces spawn over several frames (25 per frame by default), and materials are charged as they spawn.
- Grids over 400 cells preview as an outline instead of ghosts, and are checked when you place.
- Spacing comes from each piece's snap points (its mesh size if it has none), so gap 0 can leave a hair of a seam or overlap on some pieces.
- Pieces that only touch, rather than snap, may end up with less structural support than hand-placed ones.
- Undo removes only pieces you created that still exist, and refunds their materials.
- Cultivated-ground and ground-only rules are not re-checked per cell.
Support development
Smart Build is built for the fun of it. If it has saved you an afternoon of clicking and you feel like buying a round, a PayPal contribution is very welcome and entirely optional.