
LethalConfig
Provides an in-game config menu for players to edit their configs, and an API for other mods to use and customize their entries.![]()
LethalConfig
LethalConfig is a mod configuration menu that allows players to edit their configs from within the game. It also provides a simple API for developers to customize their mod and config entries.
Inspired by Rune580's RiskOfOptions
Summary
Supported Types
Currently, LethalConfig allows developers to add the following types of interfaces for ConfigEntry's:
| Component | Value Type | ConfigItem Type |
|---|---|---|
| Integer Slider | int |
IntSliderConfigItem |
| Integer Input Field | int |
IntInputFieldConfigItem |
| Float Slider | float |
FloatSliderConfigItem |
| Float Step Slider | float |
FloatStepSliderConfigItem |
| Float Input Field | float |
FloatInputFieldConfigItem |
| Text Input Field | string |
TextInputFieldConfigItem |
| Hex Color Input Field | string |
HexColorInputFieldConfigItem |
| Enum Dropdown | Enum |
EnumDropDownConfigItem<> |
| Boolean Checkbox | Enum |
BoolCheckBoxConfigItem |
| Generic Button | - |
GenericButtonConfigItem |
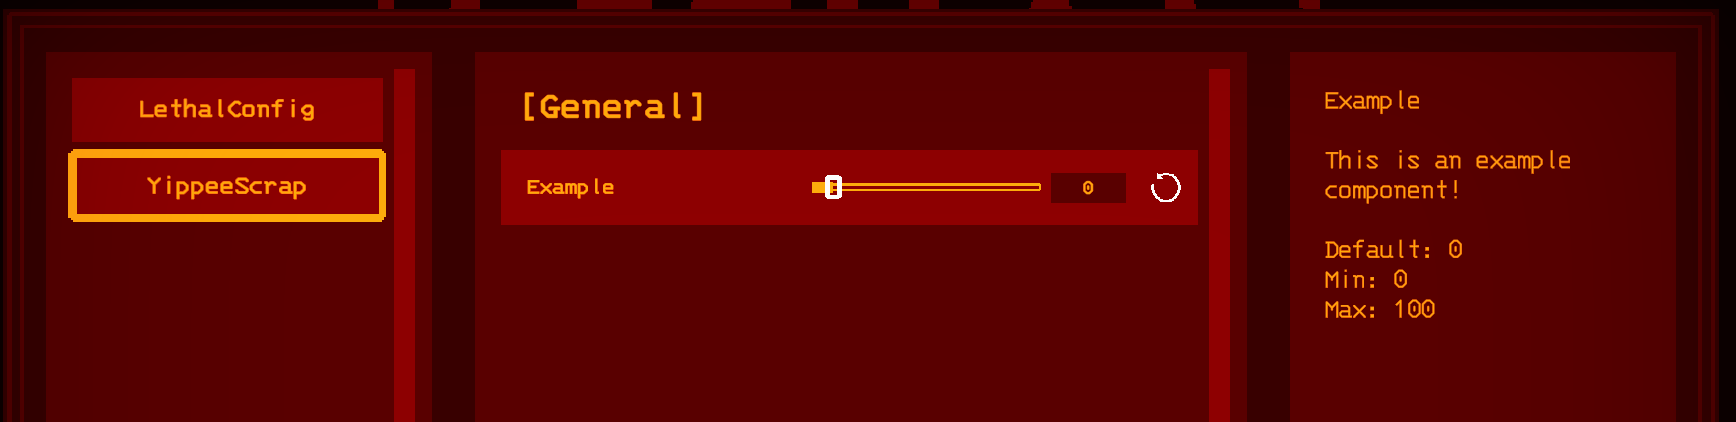
An example of the LethalConfig menu and its element types
Usage
Automatic generation
As of 1.1.0, LethalConfig automatically generates mod entries and detect all ConfigEntry's declared by said mods, and tries its best to generate the correct UI components.
It'll assign a default mod icon and will have a disclaimer in the mod's and config's descriptions about them being automatically generated and that they may require a restart, as there's no way for LethalConfig to tell if a setting will take effect immediately or not.
Unless you're a mod developer that wants to customize their mod icon and description, manually setup the UI components (e.g. use a slider instead of a number text field), or mark settings as non-restart required, you don't need to do anything else other than installing the mod.
Some types may not have a UI component developed for it yet. In these cases, LethalConfig will ignore the ConfigEntry. More types will be covered over time.
Setting up
To start using LethalConfig on your mod, add a reference on your project to the LethalConfig's dll file. You can get the dll by downloading the LethalConfig mod on Thunderstore.
To access the API, simply use the LethalConfig namespace or import it on your source file:
using LethalConfig;
It is also recommended to add a BepInDependency attribute to your plugin to hint BepInEx that your mod has a dependency to it:
[BepInPlugin(PluginInfo.Guid, PluginInfo.Name, PluginInfo.Version)]
[BepInDependency("ainavt.lc.lethalconfig")]
public class MyVeryCoolPlugin: BaseUnityPlugin {
    ...
}
Adding a ConfigItem
With everything setup, you should now have access to the main LethalConfigManager and are able to add any of the available components you want.
First, you create your ConfigEntry from BepInEx like you would normally:
var configEntry = Config.Bind("General", "Example", 0, "This is an example component!");
With your ConfigEntry in hand, you can now create and register a new item to the menu by using the following method:
var exampleSlider = new IntSliderConfigItem(configEntry, new IntSliderOptions
{
    Min = 0,
    Max = 100
});
LethalConfigManager.AddConfigItem(exampleSlider);
And that's it, you now have created your first component!
LethalConfig automatically picks up some of your mod info, and it automatically creates sections based on the section of the provided ConfigEntry, so you do not have to worry about any extra setup in terms of layout.
ConfigItem restart requirement
By default, all items will be set to require a restart if changed. This will give a warning to the player once they apply the settings.
If you want your items to not be flagged as restart required, simply flag the constructor of the config items, either through the bool constructor overload or passing it inside the item's specific options:
// Using the slider options object
var exampleSlider = new IntSliderConfigItem(configEntry, new IntSliderOptions
{
    RequiresRestart = false,
    Min = 0,
    Max = 100
});

// Using the bool constructor overload
var exampleSlider = new IntSliderConfigItem(configEntry, requiresRestart: false);
ConfigItem CanModifyCallback
By default all items can be modified at runtime without restriction. This may not be desirable for some mods as they might need to conditionally disallow modifications.
Mods can use the CanModifyCallback of the constructor of the config items.
var exampleCheckbox = new BoolCheckBoxConfigItem(configEntry, new BaseOptions
{
    CanModifyCallback = CheckboxCanModifyCallback
});

// This gets called everytime the config entry gets displayed in the UI.
private static CanModifyResult CheckboxCanModifyCallback()
{
    // Return true if the entry can be modified.
    // Return false if it should be modified.
    // When returning false You should also include a message for the reason
    // that the config entry cannot be modified.
    return (false, "Example reason");
    // you can also return only a bool, or CanModifyResult.True()/CanModifyResult.False(reason)
}
Disabling/Skipping Automatic Generation
You can skip automatic generation per ConfigEntry, Config section, or for your entire mod.
var configEntry = Config.Bind("General", "Example", 0, "This is an example component!");
var skippedConfigEntry = Config.Bind("Skip This Section", "Example 2", 0, "This is an example component!");

// skips automatic generation for the ConfigEntry.
LethalConfigManager.SkipAutoGenFor(configEntry);

// skips automatic generation for the Config section "Skip This Section".
LethalConfigManager.SkipAutoGenFor("Skip This Section");

// skips automatic generation for the calling mod.
LethalConfigManager.SkipAutoGen();
Listening to setting changes
Note that players will most likely expect settings to take effect immediately if not prompted to restart. If you need to listen to changes to values of your configuration, ConfigEntry provides a mechanism for that:
configEntry.SettingChanged += (obj, args) =>
{
    logSource.LogInfo($"Slider value changed to {configEntry.Value}");
};
Generic buttons
You can use a GenericButtonConfigItem if you want to create a button item to run code when its clicked. You can use it to open custom menus for your mod or run some logic through a callback.
This item is not tied to any ConfigEntry, so you're expected to pass the section, name, and description of the item.
LethalConfigManager.AddConfigItem(new GenericButtonConfigItem("Section", "ItemName", "Description", "ButtonText", () =>
{
    // Code you want to run when the button is clicked goes here.
}));
Overriding display properties of items
Sometimes you may want to show configs in a different category, with a different name, or different description, without changing the underlying ConfigEntry instance.
LethalConfig allows you to modify these properties visually so that it shows whatever name, section and description you want.
var boolCheckBox = Config.Bind("Example", "Bool Checkbox", false, "This is a bool checkbox.");
var configItem = new BoolCheckBoxConfigItem(boolCheckBox, new BoolCheckBoxOptions
{
    Section = "General",
    Name = "Enable something",
    Description = "Does something interesting"
});
In the above example, the item will be displayed under the "General" section, with the "Enable something" name, and mousing over the item will show the new description. These are all visual changes, and the underlying entry is unnafected, making it possible to adjust names without having BepInEx create an entire new config for you.
Customizing mod's icon and description
LethalConfig automatically attempts to load your mod's icon and description from your Thunderstore manifest, but also allows you to override them.
To override your mod's icon in its entry, simply call LethalConfigManager.SetModIcon passing an instance of UnityEngine.Sprite. A sprite can be loaded from an AssetBundle.
var aVeryCoolIconAsset = assetBundle.LoadAsset<Sprite>("path/to/asset.png")
LethalConfigManager.SetModIcon(aVeryCoolIconAsset);
To override your mod's description, simply call LethalConfigManager.SetModDescription passing a string.
LethalConfigManager.SetModDescription("Very cool mod description!");
Building LethalConfig
If you want to contribute and/or need to build LethalConfig yourself, just open the project and import Lethal Company using the included ThunderKit. To do so, follow these steps to setup your project:
- Clone the repository and open the project with Unity
2022.3.9f1.- If Unity asks if you want to open in Safe Mode at any point, click to ignore.
- On the ThunderKit window that opened, go to
ThunderKit Settings, set your game path and executable to your Lethal Company folder and exe file.- If the ThunderKit window didn't automatically open, you can find it on
Tools > ThunderKit > Settings.
- If the ThunderKit window didn't automatically open, you can find it on
- ThunderKit will prompt you to restart the project a couple of times. After the restarts, the project should be setup!
With the project setup, simply select the Publish pipeline and the LethalConfigManifest at the top of the project, then click execute. After it's done, it should generate a zip file under the ThunderKit/Staging folder containing the mod.


Issues and Suggestions
If you have an issue with LethalConfig, or want to suggest a feature, feel free to open an issue at the GitHub repository.
Alternatively, you can also leave your suggestions and issues on the LethalConfig post under the Mod Releases forum in the Unofficial Lethal Company Discord Server.
Credits
- Search icon - Discover icons created by Smashicons - Flaticon