
MordasGearhold
Three switchable equipment sets, shared inventory, 8 hotkey quickslots, 3 ammo slots, up to 3 trinkets and utilities, weightless coin slot, transmog looks, armour dyes and weapon glow colours in a Valheim-style panel.
Three sets. One inventory. Your gear, your look, your colours.
Switch your whole loadout with one key, keep food, potions and ammo on hotkeys, wear a second weapon on your back, and dress every piece of armour in any look and any colour. Other players see it too.
Needs no server mod. Valheim 1.0.20 · BepInExPack 5.4.2350+ · Everyone sees your looks; your colours are seen by players who also have Gearhold.
Source and issues · More mods by Morda

 |
 |
 |
 |
|---|---|---|---|
| Sets 3 loadouts, one click or hotkey, shared inventory |
Quickslots 8 hotkey slots plus up to 9 custom slots |
Weapon 2 A second weapon on back or hip, R swaps |
Ammo 3 ammo slots, Alt+1/2/3 |
 |
 |
 |
 |
|---|---|---|---|
| Trinkets Up to 3 trinkets and 3 utility items |
Transmog Wear any known look, save outfits as presets |
Dyes Colour every material zone, others see it |
Death safe Only the active set goes into the grave |

| Action | Result |
|---|---|
| Left-click an item in the inventory, then left-click a slot | The item moves into the slot. Armour is equipped; ammo is equipped if you have none in use. |
| Left-click a filled slot | Equipment goes back into the inventory grid. A quickslot item or the coins are picked up: click another quickslot to move or swap it, or an inventory cell to put it back. |
| Right-click a slot | Use or equip / unequip the item like in the vanilla inventory (eat, drink, use this ammo). Hold Shift to open the look menu of armour, a shield or a weapon instead. |
| Key button under a quickslot, food, mead, ammo or Weapon 2 slot | Click, then press the new key (Shift/Ctrl/Alt allowed). Esc cancels, Delete clears. |
| SET 1 / SET 2 / SET 3 tabs or hotkeys | Switch sets. |
Where everything is
Slots: Head, Chest, Legs, Cape (left column) and Shield (right column), with the custom slots below them; Utility 1–3 and Trinket 1–3 in a row under YOUR VIKING; Food 1–3, Weapon 2 and Mead 1–3 above the quickslots in the same columns; Quickslot 1–8; the ammo drawer at the right edge; the coin slot (top right). YOUR VIKING scrolls with the mouse wheel when it is longer than the panel. Right-click on Trinket/Utility 2 or 3 makes it the main one (it swaps with slot 1).
Keys and limits
Key conflicts:
- A key you assign is taken away from any other Gearhold hotkey that used it.
- A key that vanilla also uses (e.g. X = Sit, Q = Auto-run) shows a note.
No set switch while attacking, dodging or swimming, while armour is still being put on, or while you hold an item on the cursor.

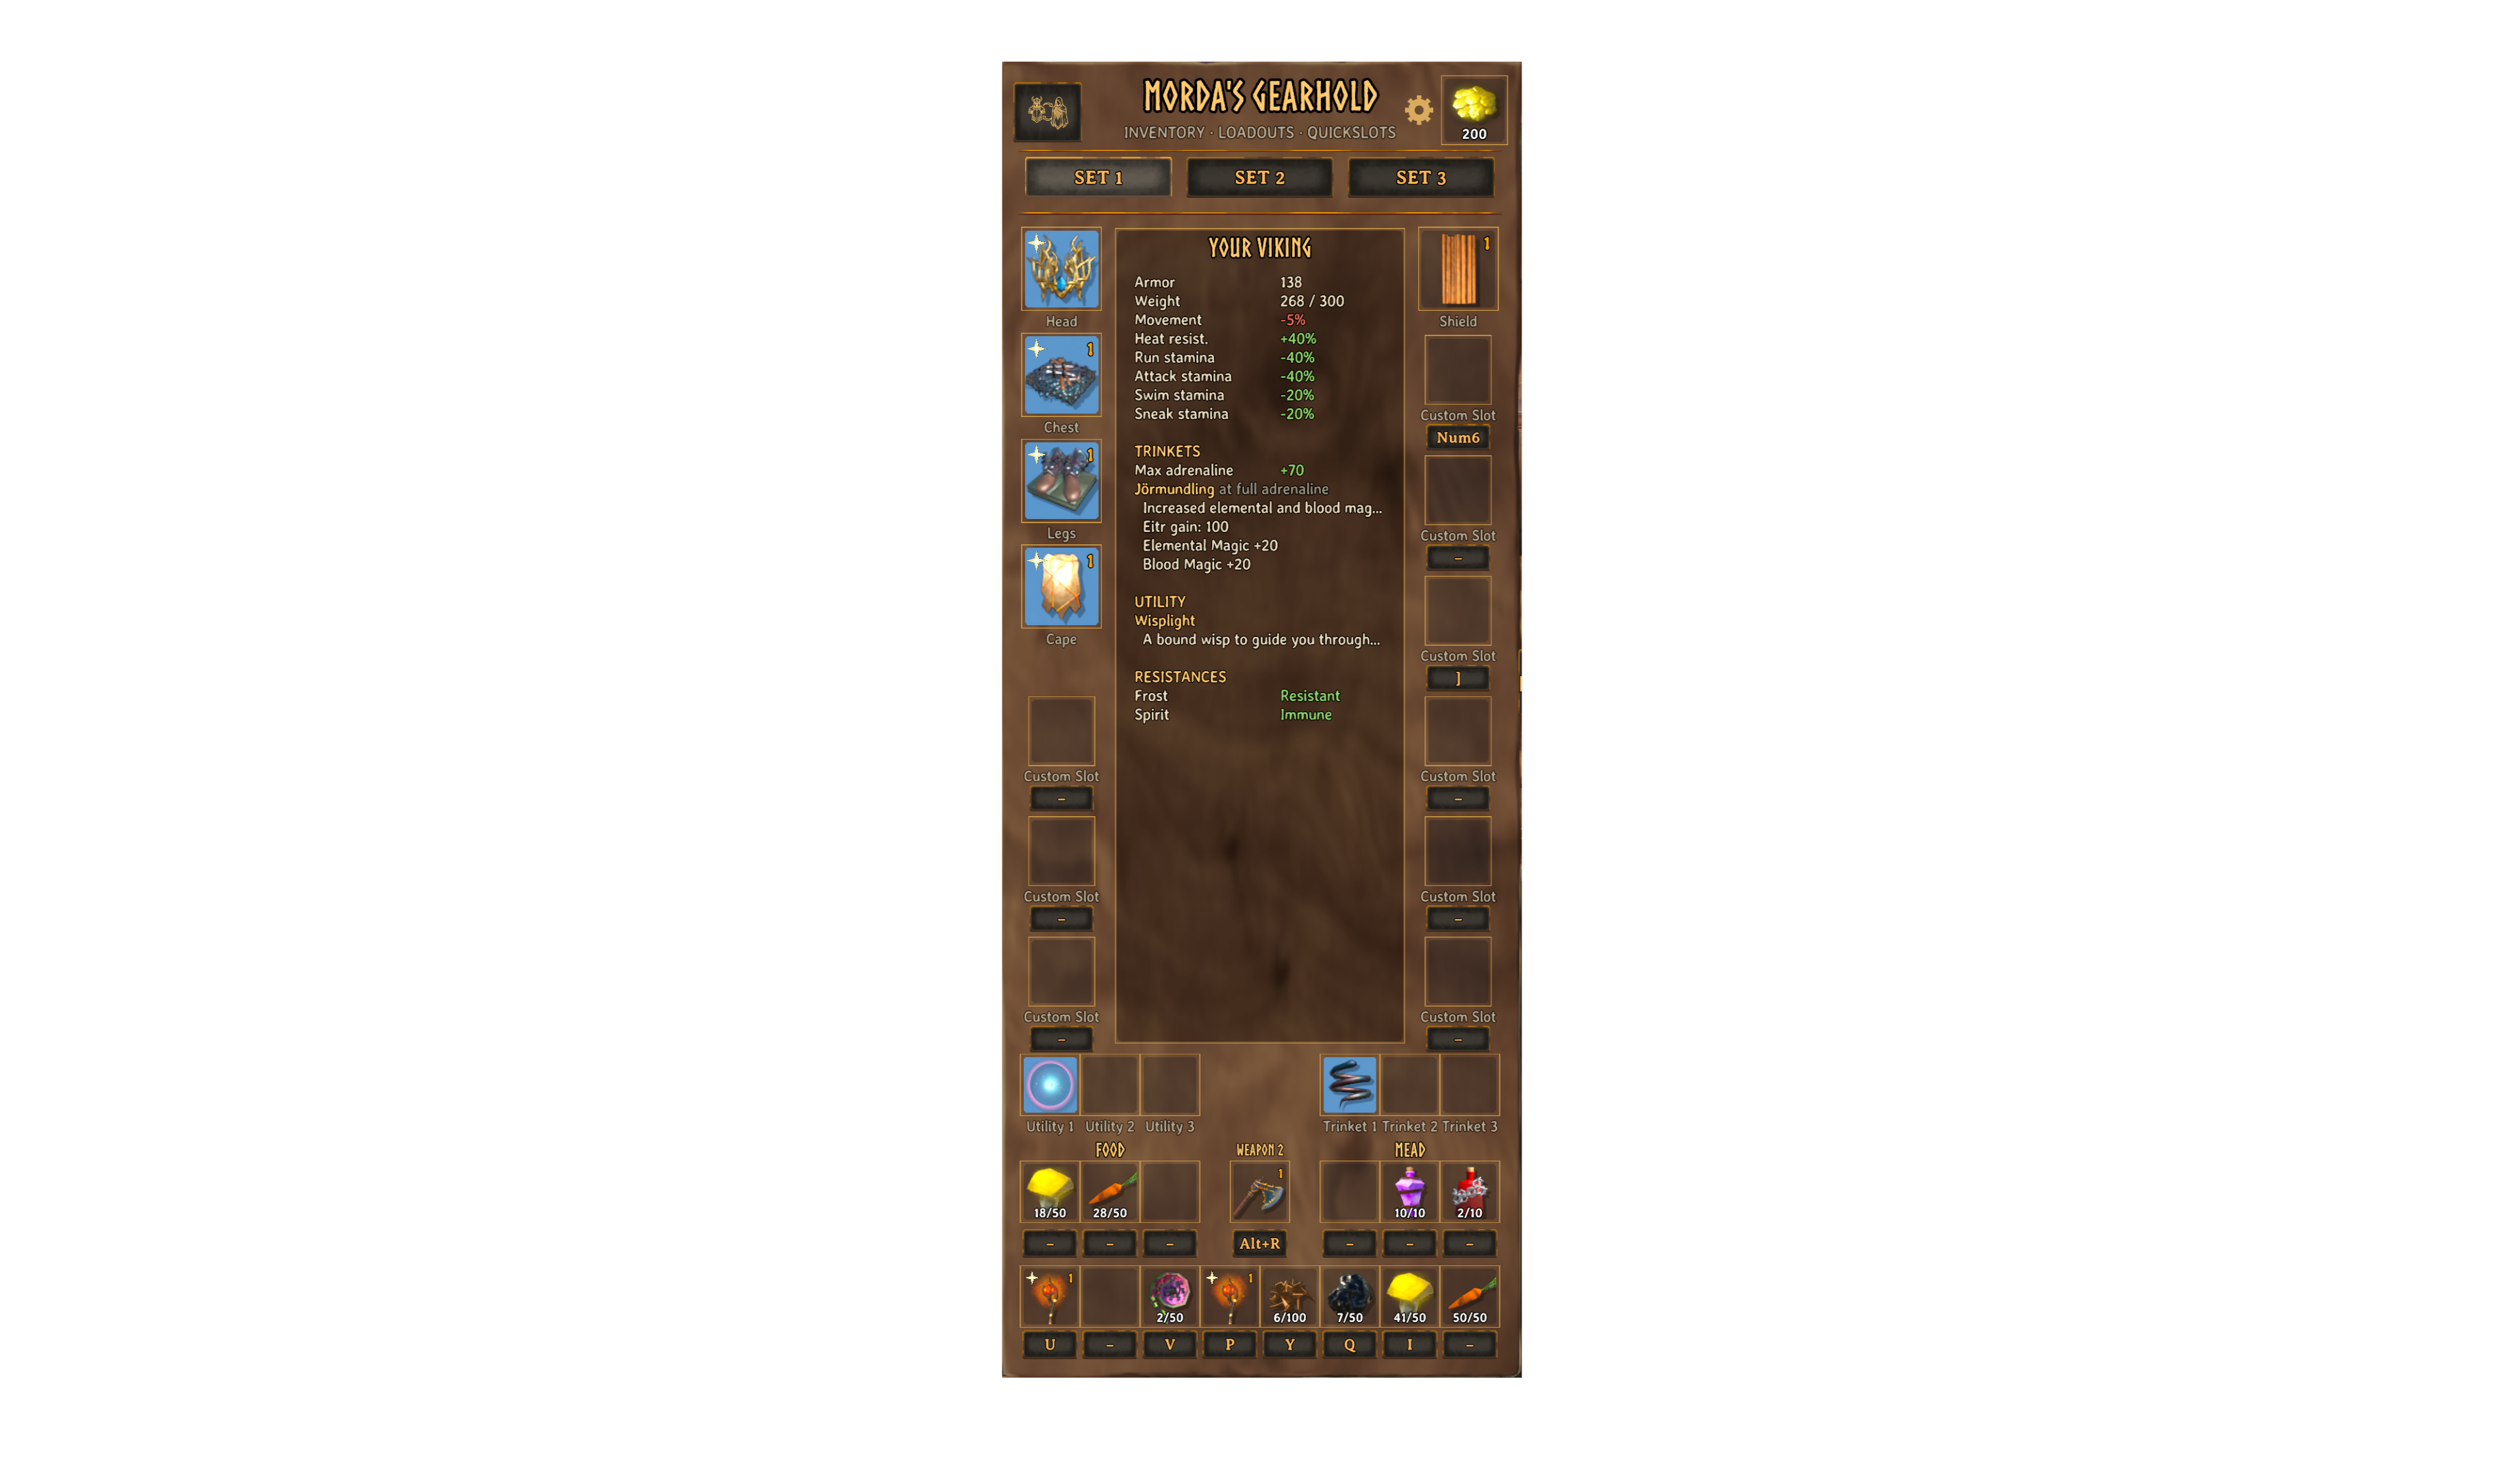
Everything of a set in one window: the three set tabs, your armour and shield, the YOUR VIKING sheet, the coin slot, and below it the rows with utility, trinkets, food, mead, Weapon 2 and the quickslots.
Sets
- Three independent equipment sets. A set is exactly what lies in the Gearhold panel: armour, shield, three utility items, three trinkets, three ammo slots, 8 quickslots (food, potions, ...), food and mead slots and the custom slots.
- Weapons and bows stay in your hotbar. The inventory grid, hotbar included, is shared by all sets. A set switch never touches it.
YOUR VIKING
-
YOUR VIKING shows:
- your armour and weight,
- the equipment modifiers (movement, stamina costs, heat),
- WEAPON (only while a weapon is drawn): damage per type, stamina/eitr use, block armour, block force, parry bonus, knockback, backstab, durability,
- SHIELD (only while a shield is worn): block armour, block force, parry bonus,
- UTILITY (only with worn utility items): each item by name with its while-worn effect, and with Path of Valheiman its fixed bonuses (belts, rings) and enchantments,
- TRINKETS (only with active trinkets): total max adrenaline, and each effect with the game's own description, e.g. what happens at full adrenaline,
- RESISTANCES (e.g. Frost: Resistant, Spirit: Immune), including effects active right now,
- ENCHANTMENTS (with Path of Valheiman): the enchantments of your worn armour, shield, utility items and trinkets, added up (two "+5% Fire damage" become "+10% Fire damage"). The drawn weapon lists its own enchantments under WEAPON.
Health, stamina and eitr are left out because the vanilla HUD already shows them.
Coins, auto-equip, auto-shield
- Coin slot (top right of the panel, next to the title): coins you pick up go in there on their own and weigh nothing. It is shared by all three sets and has no limit: one full stack lies in the slot, everything beyond is kept in a purse with your character, and the slot shows the total. Traders see and take the whole amount. Coins in the purse stay with you when you die; the stack in the slot goes into the grave as usual. Turn the automatic moving off with
AutoStoreCoins. - Auto-equip: new armour, shields, trinkets and ammo you pick up or craft go into an empty slot only. Gear you already wear is never replaced. A new trinket goes into Trinket 2 or 3 when Trinket 1 is taken.
- Auto-shield:
- Equip a one-handed weapon from the hotbar, and the set's shield comes along. One-handed axes too, unless
AutoShieldWithAxesis off. - Put the weapon away, and the shield goes too. Swapping one weapon for another, or eating, keeps it.
- With a bow or two-hander, the shield is put away but stays in the shield slot.
- Equip a one-handed weapon from the hotbar, and the set's shield comes along. One-handed axes too, unless

The lower rows of the panel: utility and trinkets, 3 food and 3 mead slots with the second weapon between them, and the 8 quickslots, all with the key you set under each slot.
Quickslots
- Quickslots with their own hotkeys (default
Z,B,N,H), changeable right in the panel. Example: put food in, press the key, eat.- Unlike the vanilla hotbar, a quickslot key never hands its item to what you are looking at (item stand, mannequin, ...). Switch this with
QuickslotsUseOnTarget. - All Gearhold hotkeys only work while you play in the world: not in menus, not in the build menu and never while you type into a text field (e.g. a search box).
- Unlike the vanilla hotbar, a quickslot key never hands its item to what you are looking at (item stand, mannequin, ...). Switch this with
Food and mead
- Food and mead slots: 3 food and 3 mead slots right above the quickslots, per set. Food slots take food only, mead slots meads and potions. Each has its own hotkey (set with the button under the slot, like the quickslots; unbound at first); right-click eats or drinks too. When one of your three food buffs runs out, Gearhold eats from the food slots on its own (
AutoEatFoodSlots, on by default;AutoEatEarlyeats again as soon as the game allows). On the HUD they get their own bars: food next to the food boxes at the bottom left, meads right of the quickslots.
Trinkets and utility items
- Up to three trinkets and three utility items at once (switch slots 2 and 3 on with
TrinketSlots/UtilitySlots, or in the SLOTS window; by default only the vanilla slot is shown):- Slot 1 is the normal vanilla slot. Slots 2 and 3 are always active while something lies in them.
- Right-click a trinket or utility item in the inventory: when slot 1 is taken, it goes into a free slot 2 or 3.
- On death all three go into the grave like the rest of the set.
Weapon 2
- Weapon 2 (between the food and mead slots, per set): put a second weapon there, melee, bow or crossbow.
- The hide key (R) takes the weapon from the slot into your hand, like a right-click on it: it stays in its slot and nothing moves in your hotbar. Press it again to get the previous weapon back. With an empty slot, or no weapon in hand, R works like vanilla.
- Own swap key: click the box under the slot and press a key (
Weapon2Swap). Then only that key swaps and R is vanilla again. Delete clears it. - Worn on the body: the weapon hangs where vanilla puts a weapon away: one-handers at the hip, two-handers, atgeirs and bows on the back. Other players see it too (
ShowWeapon2OnBody). - Switch the whole feature off with
EnableWeapon2: the slot is gone, R is vanilla, a weapon still in the slot goes back into the inventory.

Three ammo slots in a drawer on the right edge of the panel. Click the arrow tab to open or close it.
Ammo drawer
- Three ammo slots:
Alt+1,Alt+2,Alt+3pick the ammo you shoot. The slots sit in a drawer at the right edge of the panel: click the arrow tab (AMMO) to open or close it. Each key sits as a button under its slot: click it to set another one. Holding Alt keeps the vanilla hotbar from also using item 1–3. - While a bow is drawn, a small list above it in the hotbar shows the fitting arrows from your ammo slots with their amount; the ones in use are gold (
ShowBowAmmo).

Up to nine slots (a column under the shield and one under the cape) take only the items you name: type the prefab names in the SLOTS window, or set CustomSlot1 to CustomSlot9 in the config (section 1 - Inventory), as a comma separated list, e.g. Wishbone,Demister. Items of other mods work too, as long as you use their prefab name.
Rules
- A slot with an empty list is hidden. Under each slot you see the name of the item in it, or of the first name in its list.
- The items stay real inventory items (weight, tombstone and saving work as usual) and belong to the active set, so each set can hold something else in the same slot. The allowed names are the same for all sets.
- Each slot has its own hotkey (config
Custom1toCustom9, or the key button under the slot): it uses the item (eat, drink, equip).
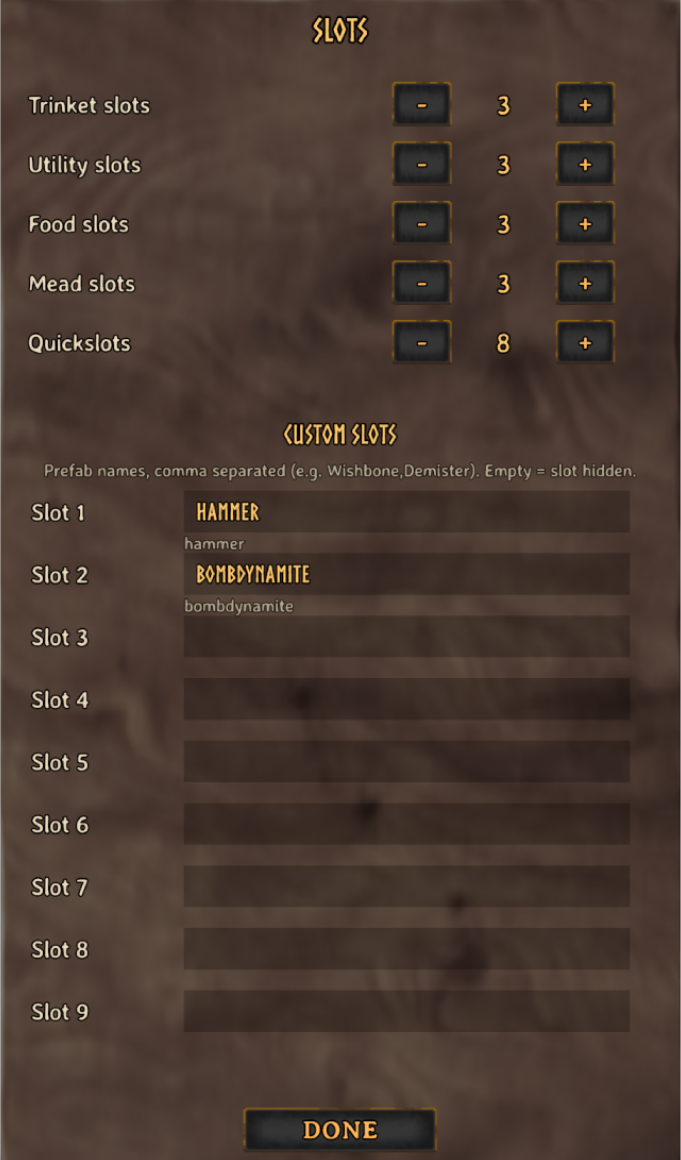
SLOTS window
- SLOTS window: the settings gear in the panel's top bar has a SLOTS button. There you set how many trinket, utility, food, mead and quickslots you have, and type the prefab names of the custom slots. The same values are in the config file.

Your quickslots, food and meads as small bars on the screen, so you do not need the panel open.
Quickslot bar
- Quickslot bar on the HUD: at the bottom centre you see every occupied quickslot with its item and amount, and its hotkey on one line above it (also long keys like
Alt+1). A changed key shows up immediately. The bar hides while the inventory is open; its size is set withQuickslotBarScale.
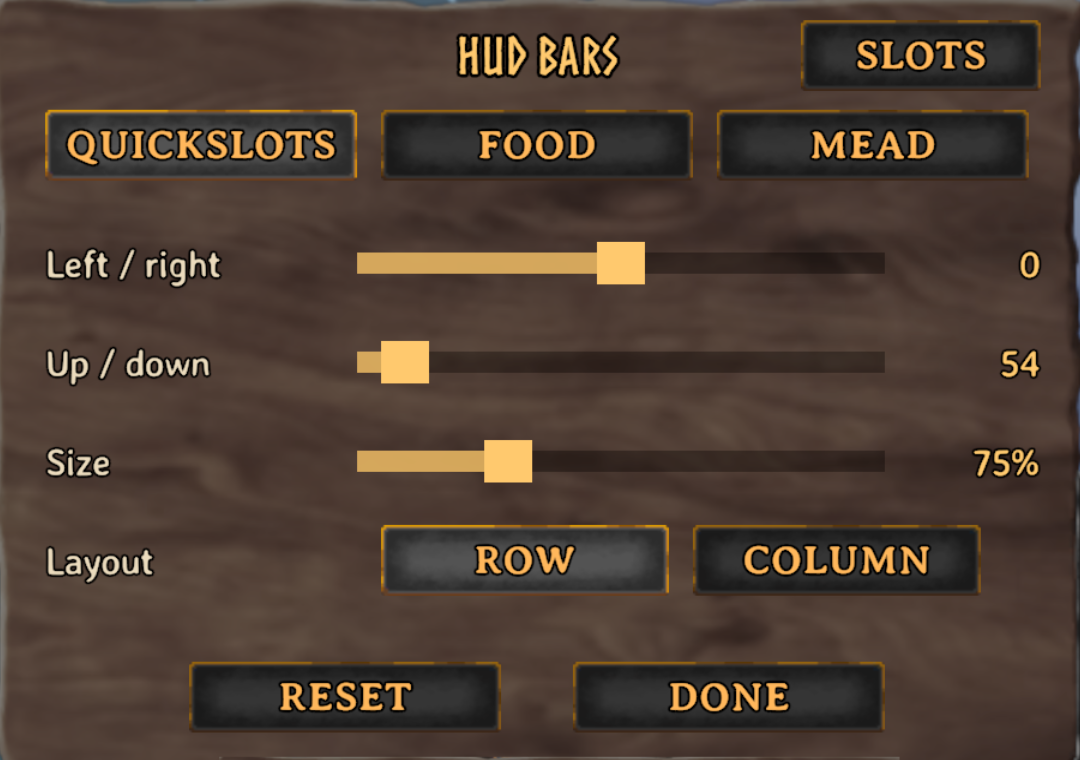
Move the bars
- Move the bars: the settings gear in the panel's top bar opens a small window (the HUD bars window). Pick QUICKSLOTS, FOOD or MEAD, move that bar with the sliders (left/right, up/down), set its size and choose ROW or COLUMN for it. While it is open the inventory steps aside and all three bars show on screen, so you see every move at once. RESET puts the chosen bar back to its default spot, size and layout.

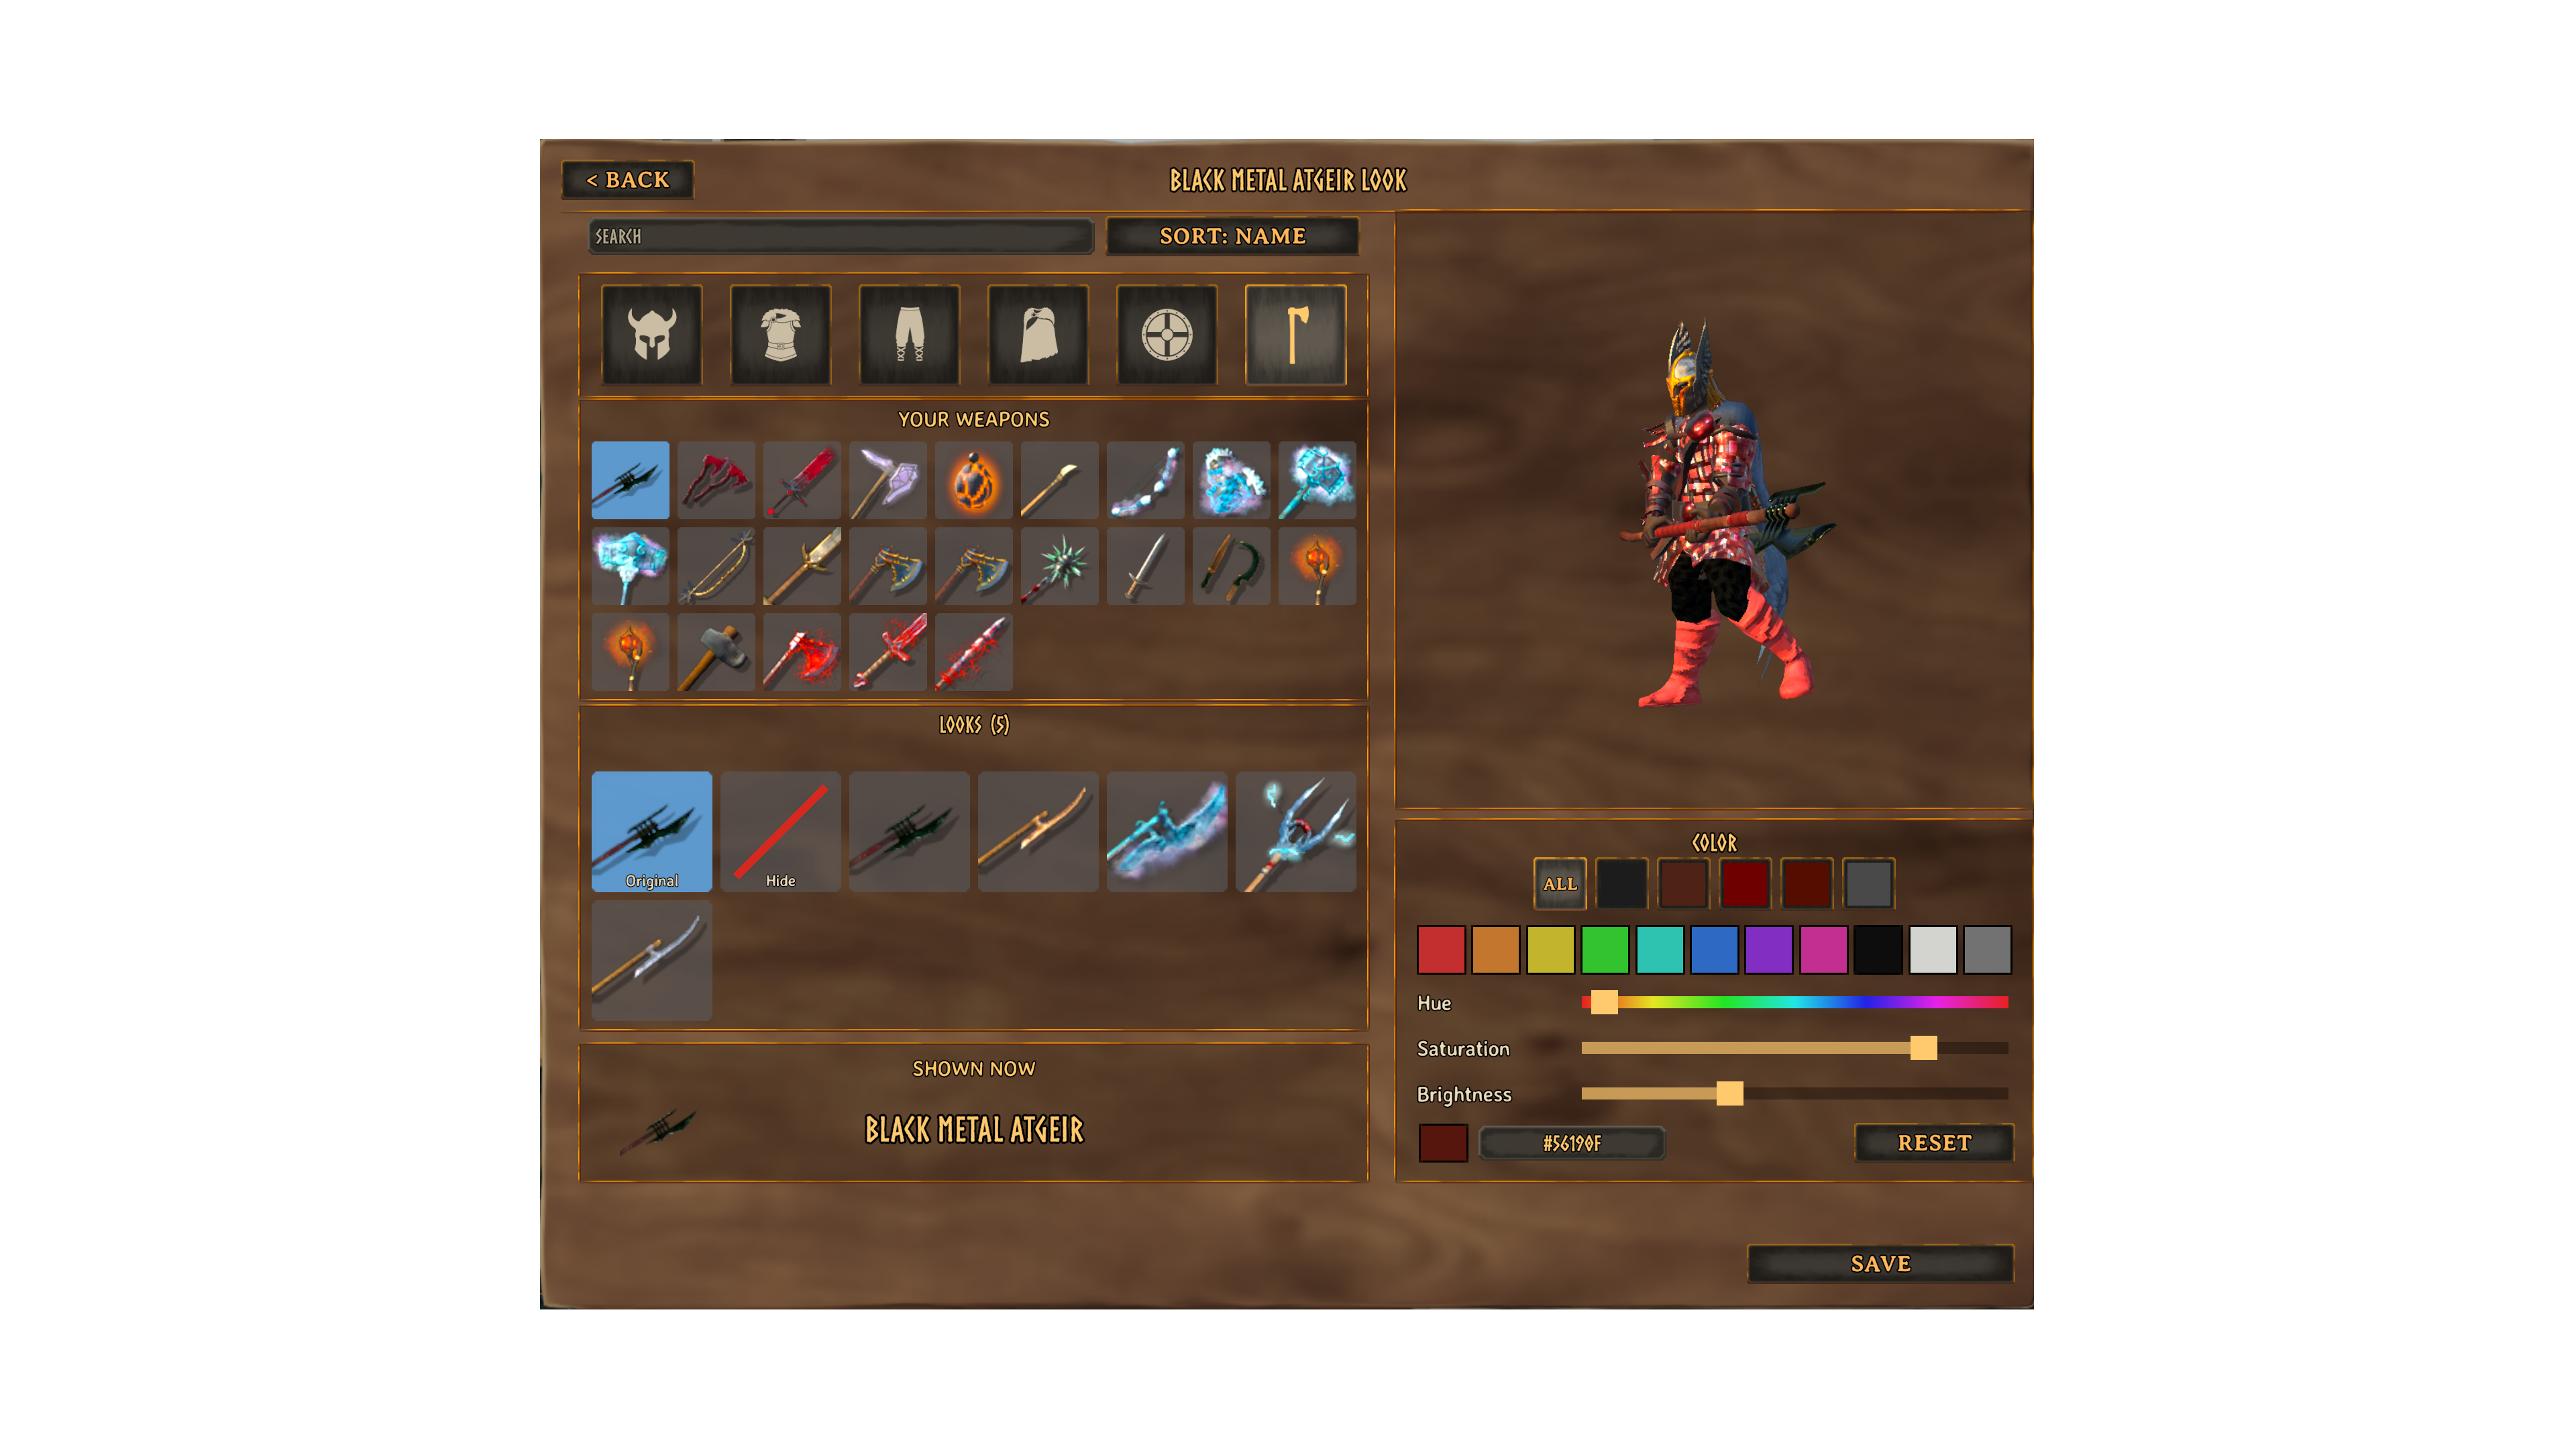
One menu for how your gear looks and what colour it has: your character in 3D on the left, a tab for each piece, the looks you have unlocked and below them the COLOR section.
Transmog (looks)
Change how your gear looks without changing the gear itself. The menu opens in the middle of the screen with your character in 3D, a tab for each piece and the looks you have unlocked.
- Unlocking: every piece whose recipe you know is available right away, the same list the crafting menu uses. You do not need to own it. Pieces you crafted count as well. Gear no recipe makes (for example clothes you buy from a trader) unlocks its look as soon as you carry it.
- Armour and shield (Head, Chest, Legs, Cape, Shield): click the transmog button in the panel's top left corner, or Shift + right-click one of these slots (a plain right-click equips and unequips like in the vanilla inventory). The menu opens in the middle of the screen, with a tab for each piece, so you can dress your whole set without leaving it. While it is open the inventory and crafting windows step aside, so you see your character.
- Original (the first cell, showing your real item) takes the chosen look off again.
- The second cell, Hide (a box with a red slash), makes the piece invisible. To take gear off, left-click the slot.
- Or click one of your unlocked looks of the same kind.
- Looks are saved per set, so each set can have its own outfit.
- SAVE and BACK: every choice shows on your character right away, but only SAVE (under the character) keeps it. < BACK (top left), Esc or closing the inventory throws the changes away.
- Weapons and bows: Open the WEAPONS tab in the list on the left: it shows every weapon you carry (inventory, quickslots, Weapon 2). Pick one, then its look and colour. (
Alt+ right-click on a weapon opens the same tab.) Only looks of the same weapon kind are offered (axe as axe, sword as sword), so grip and animations always fit.- The look stays with that weapon, in every set.
- Upgrading a weapon at a workbench makes a new item, so its look has to be picked again.
- Marker: a piece with a chosen look, colour or Hide shows a small gold sparkle (✦) in the top-left corner of its slot. This also works for weapons in the inventory and in quickslots.
- Visibility: other players see your looks too, because the game shares visible gear. A look only shows while real gear is worn in that slot.
- Character selection: the character on the selection screen already wears the looks and colours of its active set.
Presets
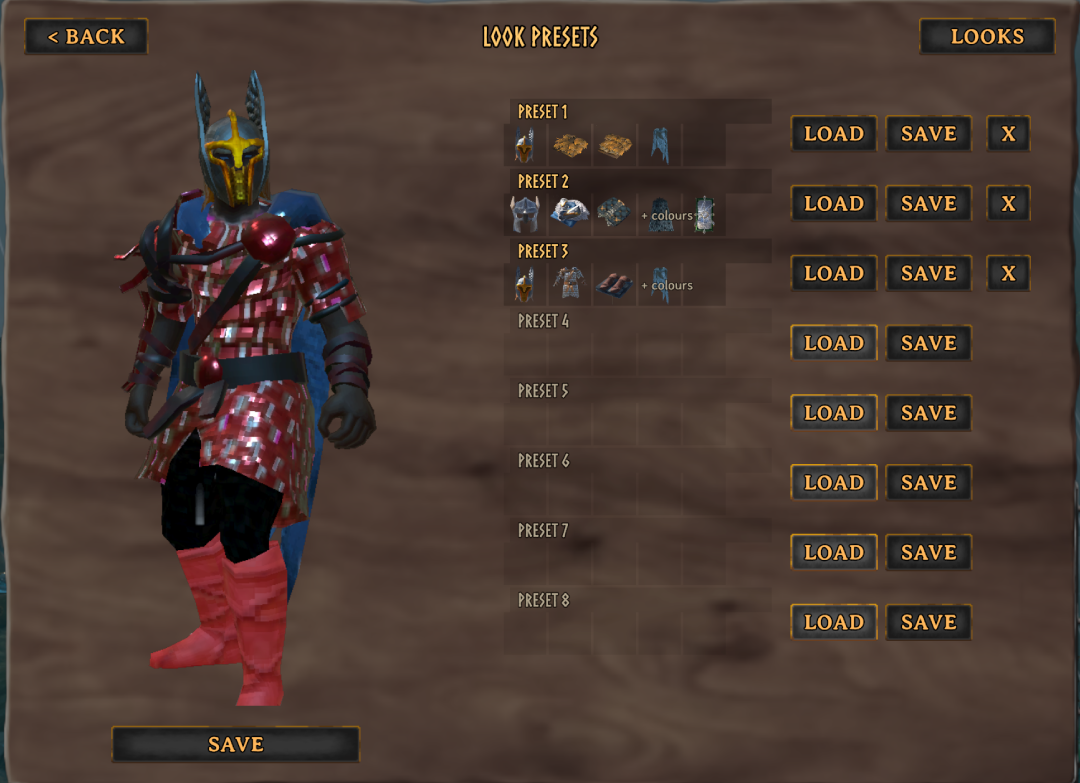
Save a whole outfit and put it on again later.
- The PRESETS button (top right of the look menu) opens eight preset slots. SAVE stores the looks and colours of your five pieces under that slot, click the name to rename it, LOAD puts it on the active set, X deletes it. Weapon looks and colours belong to the weapons and are not part of a preset.
Dyes (colours)
Recolour Head, Chest, Legs, Cape and Shield in the same menu: your character is shown in 3D on the left, so every choice is visible at once (drag to turn it, mouse wheel to zoom); below the looks you find COLOR. Pick a zone, then a colour.
- Colour zones: a piece with several materials (metal, leather, cloth ...) is split into up to eight zones, found from the colours of its textures and, where the armour has one, its metal map. In the COLOR section every zone is a small chip: the ring is its original colour, the middle shows its colour now. Click a chip and the zone blinks yellow on your character, so you see what you are about to change; then colour just that zone. ALL colours the whole piece. Zones are found automatically and the same way every time.
- You choose the colour itself: click a swatch (Red, Orange, Yellow, Green, Teal, Blue, Purple, Pink, Black, White, Grey), drag the Hue / Saturation / Brightness sliders, or type a #RRGGBB value. The zone takes that colour and keeps its own light, shadow and fine colour variation, so it does not turn into flat paint.
- RESET goes back to the original colours of the chosen zone (or of all of them).
- Skin under and around the armour keeps its colour: the painted armour is only recoloured where it covers the body.
- Colours are saved per set and work together with looks, so a borrowed look can be dyed as well.
- Shields and models without colour controls: shaders that have no hue control of their own (many shields, weapons and some armour) are dyed by recolouring a copy of their texture, so every piece can take a colour.
- How it works: only the copies on the character are recoloured, never the item itself. The recoloured texture is made once per change.
Weapons: dye and glow
Weapons get the same COLOR section, and fire, frost and lightning weapons get GLOW and SHINE on top.
- Weapons can be dyed too: open the look menu of a weapon (
Alt+ right-click it in the inventory, or Shift + right-click it in a quickslot). It has the same COLOR section with colour zones. The colours belong to that weapon and follow it into every set; a dyed weapon gets the sparkle marker. The preview shows the weapon while you hold it; the zones are found from its model, so you can also dye one that is put away. - Weapon glow: weapons with glow effects (fire, frost, lightning, glowing cores and runes) get a GLOW section in their look menu (plain weapons without such an effect show none).
- Colour swatches: every coloured glow part takes the chosen colour: particles, lights, glowing materials and the swing trail. White makes them white.
- Brightness and strength stay, so fire still flickers like fire.
- Smoke, white shimmer and the hit effects keep their own colours.
- RESET gives the weapon its own colours back.
- The colour belongs to that weapon and follows it into every set. A weapon with a glow colour gets the sparkle marker too.
- Like the looks, it shows once you SAVE. Draw the weapon to see it in the preview.
- SHINE: upgraded weapons also carry a white shimmer. Weapons that have it and are upgraded to level 3 or more show a second row, SHINE, with the same swatches; it colours that shimmer (and its light) on its own. It is only visible on weapons that are upgraded far enough to shimmer.
Multiplayer colours
Your dyes (all colour zones), weapon dyes and GLOW / SHINE colours are sent to the other players in range through your player's network data (one short text, only when it changes). Players who also have Gearhold see them on your character, also on the Weapon 2 on your body; everyone else sees the normal colours, and the server needs no mod. ShowOthersColors (config, UI) turns off seeing other players' colours.
Tuning the colouring (for tinkerers)
These tools are in the project's tools folder, not in the mod package. Open the .html files in a browser.
- Dye lab (
tools/dye-lab.html): load any texture and see how the colouring treats it: it finds the colour zones, lets you pick a colour per zone and change every number behind it. "Als Datei speichern" givesMordasGearhold.dye.json; put it in theBepInEx/configfolder of your profile. The mod reads it again whenever it changes, finds the zones anew and recolours characters at once, no restart. Deleting the file brings back the defaults. - Zone survey (
tools/zone-survey.html): Ctrl+Shift+F10 in the world writes the textures of all armour, capes and shields (and amaterials.txt) toBepInEx/config/MordasGearhold-textures. The survey loads that folder at once and shows the zones of each texture. A texture that needs other numbers gets its own set there; "zones.json speichern" writesMordasGearhold.zones.jsoninto the same config folder, read live like the dye file. - Layout editor (
tools/layout-editor.html): drag, resize and align every part of the Gearhold panel and export the layout as JSON. Saved asMordasGearhold.layout.jsonin the config folder, it overrides the built-in layout.

What happens
- Into the grave go the inventory grid and the active set's Gearhold slots, under the normal vanilla rules.
- The other two sets stay safely on the character.
- The grave remembers its set. If another set is active when you loot it, Gearhold switches back first. Items return to their old places, and gear in empty slots is worn again.
- Whatever does not fit stays in the grave, as in vanilla.

Your items are safe
- Items of a missing mod are never deleted. They stay as dormant records and come back when the mod is installed again.
- A set switch runs within one game frame: every record is checked first, with a journal and rollback.
- Damaged data is never overwritten. It is kept under
MordasGearhold.Quarantine.*, and the log says why.

Before you remove the mod
- The two inactive sets stay stored in the save, but cannot be reached without the mod. They come back on reinstall.
- Rows beyond the vanilla limit and the hidden slot rows are dropped on the ground by vanilla at the next spawn.
- Before uninstalling, empty the panel slots of all three sets and the lower grid rows into a chest.

- Mod manager (recommended): install Morda's Gearhold with r2modman or the Thunderstore Mod Manager.
- Manual: install BepInExPack Valheim. Then put
MordasGearhold.dllintoBepInEx/plugins/MordasGearhold/.
Works with
- Path of Valheiman: works together. Gearhold switches Path of Valheiman's own equipment system (its slots beside the crafting window, purse and tool bar) off through Path of Valheiman's API, because both would use the same inventory rows. Its passive tree, loot and everything else keep working, and its item tooltips (enchantments, sockets, ...) also show on the Gearhold slots. It also never rebuilds its old inventory rows on load any more; anything still lying in a slot it does not belong in is moved into your inventory by Gearhold.
- StoreAndCraft: its dump (hotkey, hover-store, auto-stack) never takes anything out of the Gearhold slots (quickslots, food, meads, ammo, coins ...), and its Sort only sorts the grid.
- Not compatible: ExtraSlots and AzuExtendedPlayerInventory (they take over the same inventory rows).

 |
 |
 |
 |
|---|---|---|---|
| StoreAndCraft | Workbenches+ | Forager's Garden | Valheim Mannequins |
 |
 |
 |
|---|---|---|
| ServerRates | Smooth Build Repair | Any Angle |