EnemySkinKit
Toolkit for making enemy skins in the unity editorEnemy Skin Kit
This mod provides tools for creating vanilla enemy skins for lethal company from within the unity editor. Most end users will see this as a dependency for other skin mods. New maintainer Xu here, contact me on discord @xuxiaolan or at the EnemySkinKit/EnemySkinRegistry thread on Lethal Company Modded discord if any issues arise.
Features
- Code generation for a codeless workflow
- Easy, drag-and-drop replacement of materials, meshes and some sounds.
- Built-in compatibility with the EnemySkinRegistry
- Included example FBX files for all vanilla skinned meshes as of Lethal Company v56
- Extendable Skin and Skinner implementations that allow developers to make tweaks or add features to their skins
- Codeless default skin configs
Prerequisites
- Lethal Company
- Installation of Unity 2022.3.9f1
- Enemy Skin Kit and its dependencies
- Quite a bit of patience so that unity may chug as it is want to do
It's recommended that you also use Evaisa's starter project which can be found here: https://github.com/EvaisaDev/LethalCompanyUnityTemplate
Use of Thunderkit is also an optional recommendation
Setup
Setup with Thunderkit
1.Create up a new 3D (HDRP) project in Unity (or get a project template like this one https://github.com/EvaisaDev/LethalCompanyUnityTemplate). If your project still has HDRP starter assets, you should delete them. This will be the the "TutorialInfo" folder, the "ReadMe" asset, and the "Outdoor Scene." The "TutorialInfo" folder is the most important, as this contains scripts that will conflict with what we're going to try and import from the game data later.
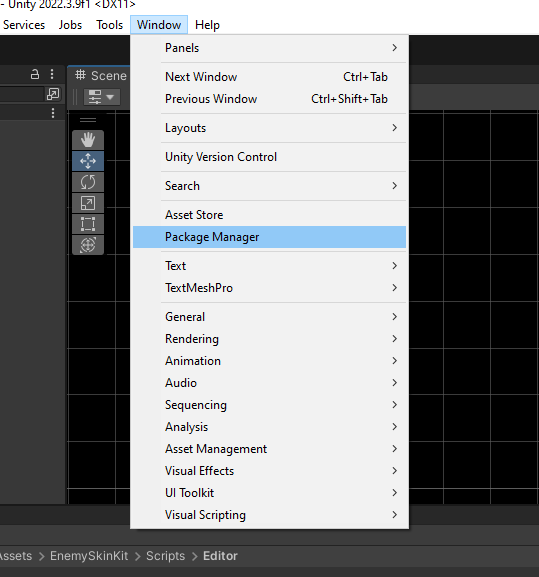
2.Now, we're going to get ThunderKit. ThunderKit is a package manager for making mods in the unity editor. Go to Window > Package Manager to open up the package manager window.
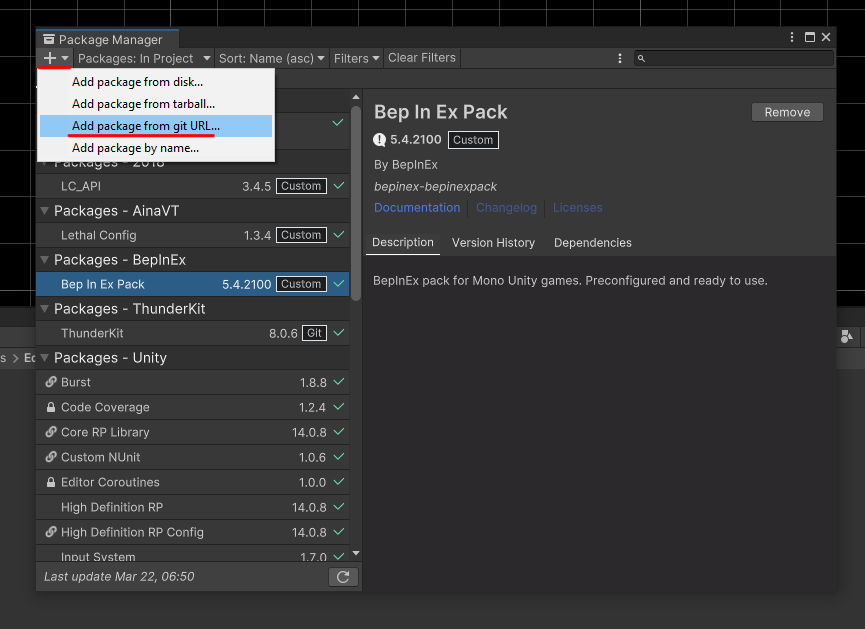
3.Click the plus dropdown in the upper left hand corner, and from that menu select "Add package from git url" and paste the following url into the input field that appears.
https://github.com/PassivePicasso/ThunderKit.git

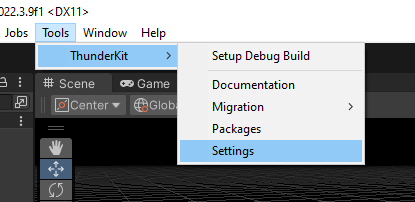
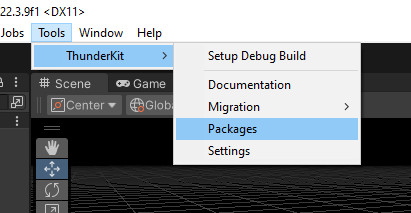
4.Unity will take a minute to download and install ThunderKit. Once the the ThunderKit package is installed, a new option will be added to the menu bar. Navigate to Tools > Thunderkit > Settings to open the Thunderkit settings menu.
5.We're going to use this menu to make a package out of Lethal Company's code. Go to "ThunderKit Settings" and in the "Locate and Load game files for project" section, click browse and navigate to your Lethal Company.exe (probably in your steamapps folder).
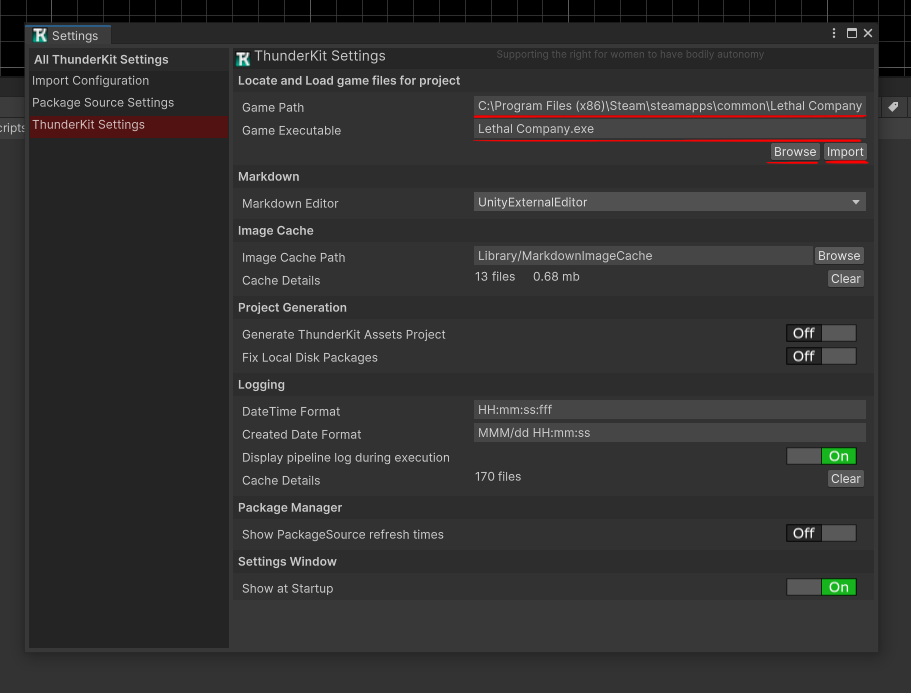
6.Click "import" and let Thunderkit do its thing. It'll ask you to restart your project a couple of times. After it's done, you'll have the necessary game code that this and other mods depend on.
ThunderKit will not import the Assembly-CSharp.dll from Lethal Company if you didn't properly dispose of the unneeded HDRP starter files. If this is the case, navigate to the same folder you found your Lethal Company.exe in, go to "Lethal Company_Data"/Managed and copy (DO NOT MOVE) Assembly-CSharp.dll to <YOUR_UNITY_PROJECT>/Packages/LethalCompany.
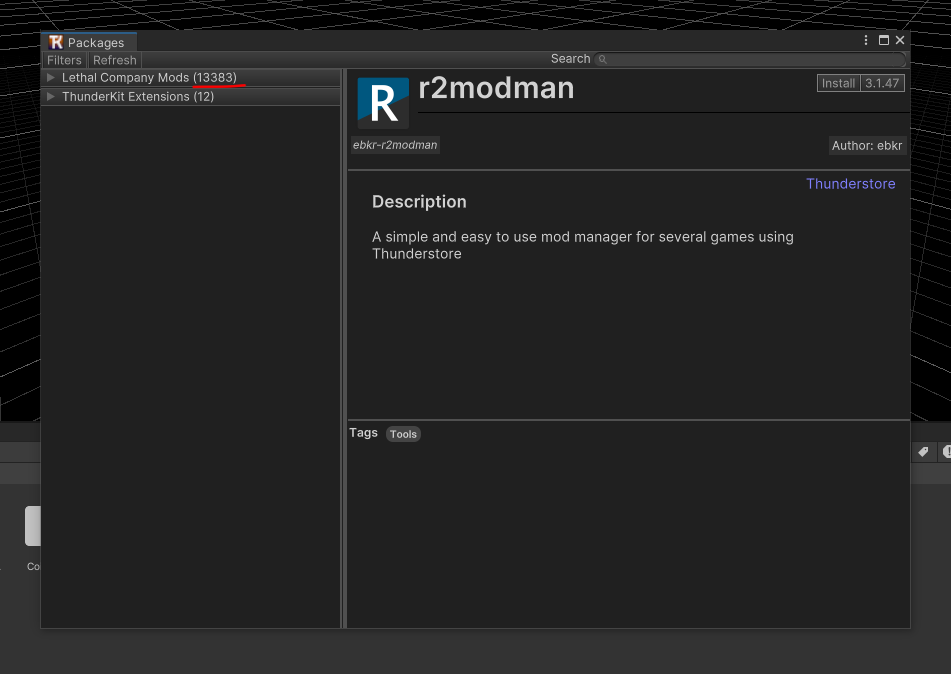
7.At this point we're nearly done with the setup. Now we're gonna get this mod's code, along with its dependencies. Go back to the Thunderstore Settings menu and navigate to "Package Source Settings." Click "Add" and from the dropdown select "Thunderstore Source." This will add a new entry to the package source list called "ThunderStoreSource."
8.Select the new entry and name it to whatever pleases you in the "Package Source" field. I just call it "Lethal Company Mods." In the url field, paste this url:
https://thunderstore.io/c/lethal-company

9.Give unity a minute to connect to ThunderStore. Once it's done, navigate to Tools > ThunderKit > Packages. If the package source you named has a silly number next to it**, you've successfully connected to Thunderstore and can now download mods.
** If you make modpacks and post them to ThunderStore when you could've just shared a ThunderStore profile code, I really don't care for you.
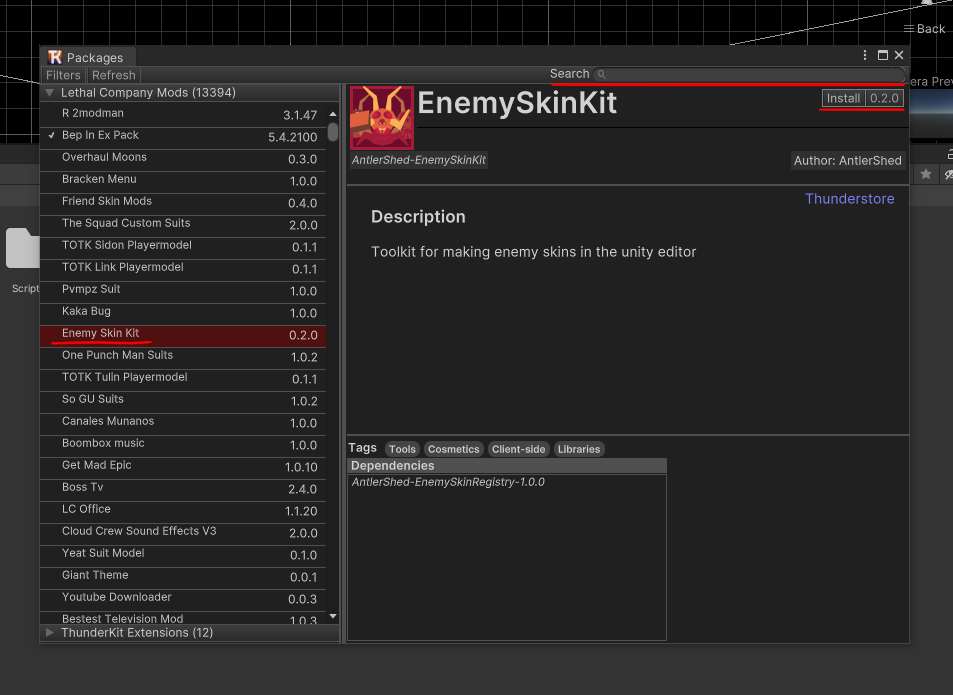
10.In the search bar in the top right, type in "EnemySkinKit" and look for this mod. Once you've found it, click "install" in the top right.
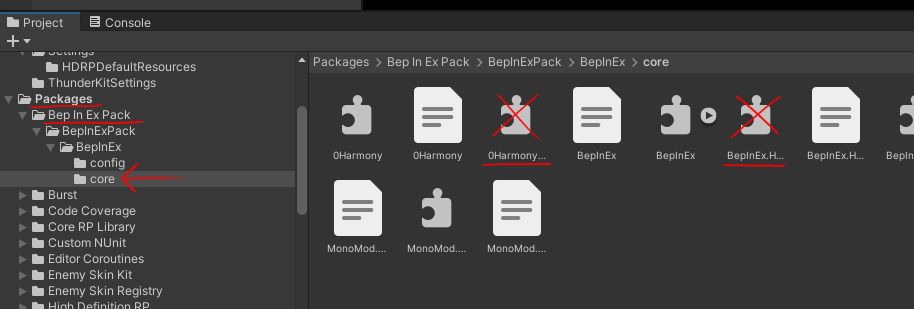
11.An annoying extra step we need to take is getting rid of some BepInEx libraries that I guess Unity doesn't agree with. Navigate to <YOUR_UNITY_PROJECT>/Packages/BepInExPack/BepInExPack/BepInEx/core and delete 0Harmony20.dll and BepInEx.Harmony.dll
12.Verify that the mod has been installed by right clicking anywhere in the project window (the little file explorer at the bottom of unity's default layout) and go to Create. If you find options for "EnemySkinKit" it's installed and you should be good to go.
Setup with LCPatcher
Eventually.
Code-Free Method
Now you should have all the stuff you need to start making skins.
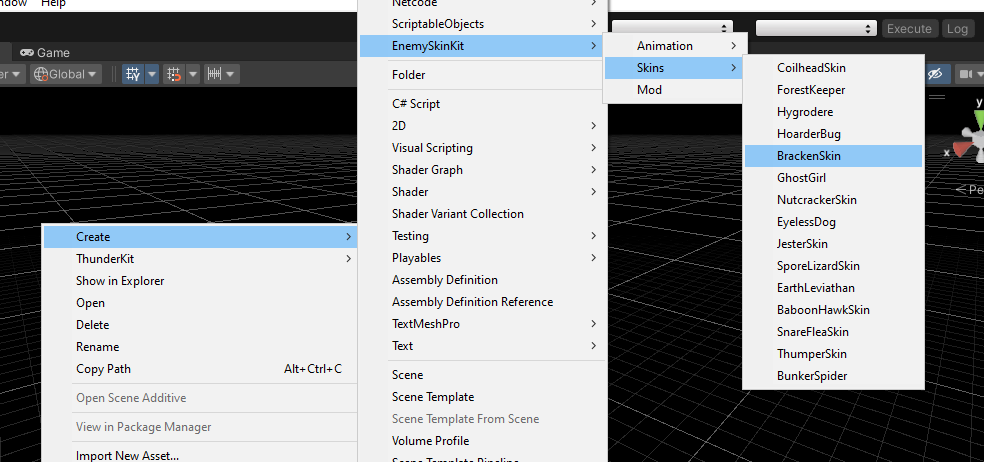
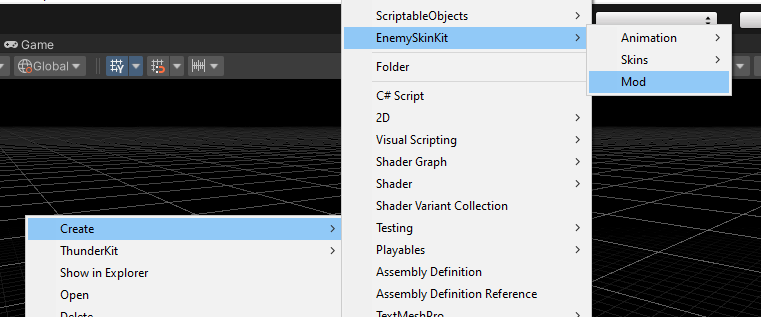
1.Right click anywhere in the assets window and select Create > Enemy Skin Kit > Skins > Enemy-You-Want-To-Skin
2.Name your skin file, then set the label, guid, and icon fields in the inspector. This is what a completed skin object might look like
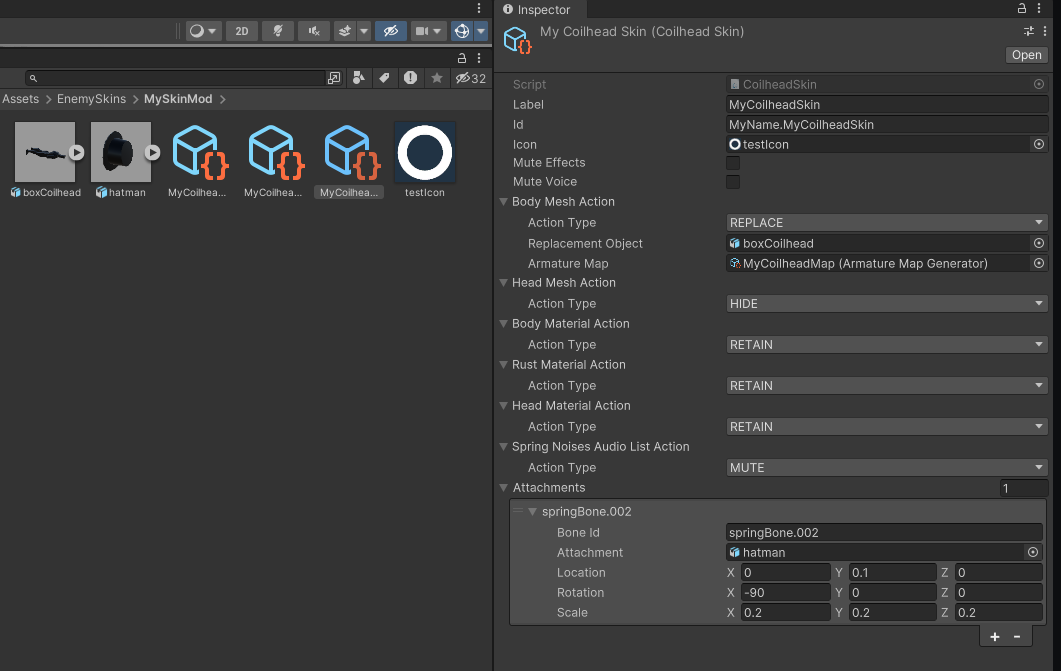
3.In the inspector, fill out the remaining fields for your skin. These fields come in the form of several "Action" types that will let you replace, hide, or keep sound effects, materials, and meshes.
Material Action - Operates on a material
- ActionType - determines what the action does when the skin is applied
- Retain - Keeps the material as is
- Replace - Replaces the material with "ReplacementMaterial"
- Replace Texture - Replaces the main texture of the material with "ReplacementTexture"
- ReplacementMaterial - the material that will replace the vanilla material when ActionType is set to Replace. See "Notes on Material Replacement and Post Processing" if the post processing effects don't show up on your modded material.
- ReplacementTexture - the texture that will replace the vanilla texture for the material when ActionType is set to Replace Texture
Static Mesh Action - Operates on one of the enemy's static meshes (like the spider's fangs or the jester's skull)
- ActionType - determines what the action does when the skin is applied
- Retain - Leaves the mesh as is.
- Hide - Disables the mesh's renderer, effectively hiding it.
- Replace - Replaces the static mesh with "ReplacementMesh"
- ReplacementMesh - the static mesh that will replace the vanilla mesh when ActionType is set to Replace
Skinned Mesh Action - Operates on one of the enemy's skinned meshes (normally the one "body" mesh)
-
ActionType - determines what the action does when the skin is applied
- Retain - Leaves the mesh as is.
- Hide - Disables the mesh's renderer, effectively hiding it.
- Replace - Deprecated method of skinning. See the "Armature Map Method" section for more info.
- Replace Mesh - Replaces the mesh that the animator animates.
-
ReplacementObject - the prefab that will be instantiated, placed into the enemy's hierarchy, and made to copy its animations when ActionType is set to Replace. Any SkinnedMeshRenderer components contained within this prefab will be handled by the skin kit. So you should be able to plop in your fbx prefab into this and be done with it, or add a whole LOD group if you find out you need it. Just make sure to include the skeleton along with it. If your SkinnedMeshRenderer component doesn't have a value in its Root Bone field that points it to the rest of the skeleton, you're model will end up t-posing. The skeleton has to match the original enemy's deform armature structure exactly. Same number of bones. Same names. And if you want it to animate correctly, the same structure. I'd recommend copying the skeleton from the example models packed with the kit. They're cleaned-up versions of ripped armatures from the game that exclude the code-driven bones present in some models.
Audio Action - Operates on one of the enemy's sounds
- ActionType - determines what the action does when the skin is applied
- Retain - Leaves the sound as is.
- Mute - Replaces the sound with nothing.
- Replace - Replaces the sound with ReplacementClip
- ReplacementClip - the clip that will play instead of the vanilla audio clip when ActionType is set to Replace
Audio List Action - Operates on a set of sounds the enemy picks from
- ActionType - determines what the action does when the skin is applied
- Retain - Leaves the sound list as is.
- Mute - Replaces the vanilla list of audio clips with an empty list
- Replace - Replaces the list of clips with ReplacementClips
- ReplacementClips - the list of audio clips that the enemy will pick from when ActionType is set to Replace
Particle System Action - Operates on a particle system
- ActionType - determines what the action does when the skin is applied
- Retain - Leaves the particle as is.
- Hide - Turns off rendering for the target particle system
- Replace - Replaces the particle system with the one given in ReplacementParticle
- ReplacementParticle - a unity prefab with a particle system at the root level which will be played instead of the vanilla particle if the action is set to Replace. See Replacing Particles for more info.
Texture Action - Operates on a texture property
- ActionType - determines what the action does when the skin is applied
- Retain - Leaves the texture property as is.
- Replace - Replaces the texture with the one given by ReplacementTexture
- ReplacementTexture - The texture that will be used to replace the target property.
Color Action - Operates on a color
- ActionType - determines what the action does when the skin is applied
- Retain - Leaves the color property as is.
- Replace - Replaces the target color with the one given by ReplacementColor
- ReplacementColor - The color that will be used to replace the vanilla color the action targets.
Attachments
You can also specify "Attachments" that will let you attach a prefab as a child of a bone in the vanilla enemy's armature. So you could attach a watch to a wrist or a mask to a face without having to replace anything. You have to match the name of the bone exactly for it to attach.
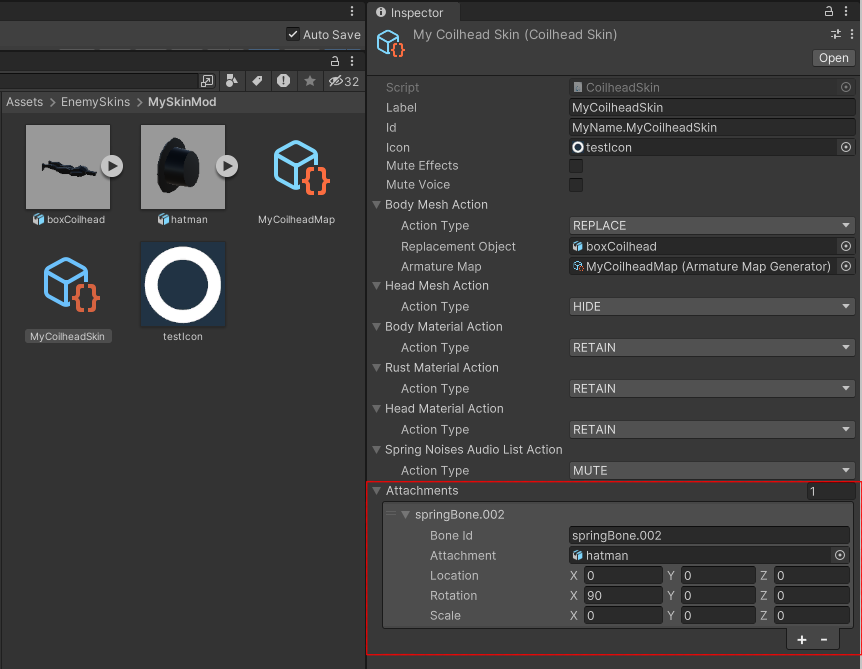
The location, rotation, and scale describe the transform of your prefab relative to the bone you're attaching it to. You can figure out what you want the values to be by attaching your prefab in the scene to the same desired bone on one of the example FBX files provided. Get it positioned correctly, then copy the values of your prefab's transform in the inspector. You could also use the Unity Explorer mod to do something similar in the game's runtime.
Just don't be a dope like me and leave the scale at zero in your example image.
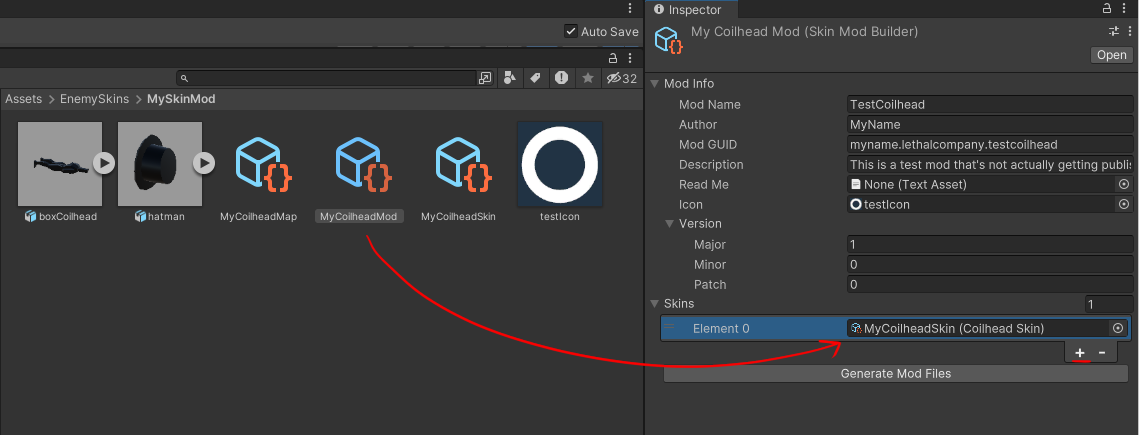
4.Right click anywhere in the assets window and select Create > Enemy Skin Kit > Mod
5.Fill out the different fields of your mod. The only optional one is the mod GUID. The others are required.
-
Mod Name - The name of your mod as it will appear in ThunderStore. Needs at least one alphabetical character. Try to keep it short, but distinct.
-
Mod GUID - The unique identifier for your mod. If not specified, it will be <Author>.<ModName>
-
Description - A short, one-to-two-sentence description of your mod. It's the one that appears next to ThunderStore thumbnails, so keep it brief.
-
ReadMe - Your readme markdown file. This site's pretty good for making readme files.
-
Icon - a 256 x 256 png file that will be your mod's thumbnail.
-
Version - Your mod's version, separated by major, minor, and patch. Check the tooltips or use good ol' google to find out when you should increment these numbers.
-
Skins - the skin scriptable objects to include in your mod. Just hit the plus button or set the amount of skins by entering a number in the skins size field. Drag and drop any skins you've created using the previous steps into this list.
-
Configs - Default frequency configurations for any included skins. These control the initial configuration of how frequently skins appear on each moon. Skin and moon ids must match character for character. The skin id will be the same as the one you specify in your skin scriptable object. The moon id will be the same as the one registered with the skin registry. For the vanilla moons the ids are:
-
41 Experimentation
-
220 Assurance
-
56 Vow
-
21 Offense
-
61 March
-
20 Adamance
-
85 Rend
-
7 Dine
-
8 Titan
-
68 Artifice
-
5 Embrion
6.Click the "Create Mod" button. If a message pops up saying that a file failed to write, hit "cancel" on that dialog instead of "try again" or "force quit."
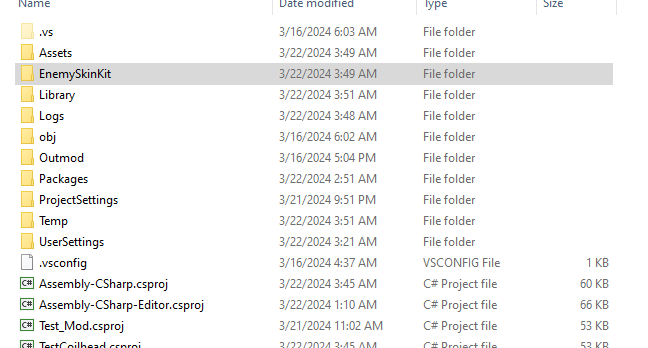
7.If successful, your mod files and the generated code will be saved to a zip file located in a folder called "EnemySkinKit" in the unity project folder (the same level as the assets folder).

8.Install your mod in whatever way that pleases you and verify that it works as intended. You can pretty easily test your mod with the ThunderStore mod manager by using its "Import Local Mod" feature. Just search for it in the settings menu.
9.Once you've verified and tested your mod, you can go to Thunderstore and upload your zip file.
10.Congrats, you have saved youself the shame of becoming a filthy, filthy programmeyre.
Particles
Particle replacement is a little quirky. Particles can be shown or hidden based on where they are or how they're configured. Replacing their materials isn't always straightforward either. This is another reason to use lcpatcher or assetripper to get the game's assets. Particles get ripped from the game properly and play like they would normally in the editor, so it's a good tool for figuring out what's going on in-game.
This will be especially important if you want to replace a particle's material rather than the entire emitter. Particles are sometimes animated using UV offsets, which means that the sequence of frames for an animated particle all sit on one texture one after another in a grid. So if you want to replace an animated particle's material, you'll have to match the frame spacing in the vanilla texture, because the vanilla particle is going to try and read it like the frames are there even if they're not.
Particle Systems themselves in Lethal Company are usually triggered such that any child particles in the game object hierarchy will also play when the top-level one (i.e. the one at the root of the prefab in our case) does. So if you need additional emitters, you can normally get them just by adding them as child objects. By that same token, replacing/hiding particles that have child particles will hide both the parent and the children. This is also the case for any particles that use sub-emitters. I've listed all particles that apply:
Nutcracker
- Replacing/hiding the Blood Spurt will hide Blood Fountain
Earth Leviathan
- Replacing/hiding the Emerge Particle will hide Emerge Shockwave
- Replacing/hiding the Submerge Particle will hide Submerge Shockwave
Old Bird
- Replacing/hiding the Charge Particle will hide all other particles that start with "Charge"
- Replacing/hiding the Blue Flame will hide Red Flame
Butler
- Replacing/hiding the Blood Particle will hide the Blood Spurt Particle
But like 3d models, teaching you what's what about particle effects is beyond the scope of this document. Anyway, there's plenty of material for learning how to use particles, and anything else in unity for that matter, that already exists for you to find.
Additional Logic Method
If you want to take advantage of the ease of using the scriptable objects, but want to use them in a larger mod, then all you have to do is load your skin scriptable object from an asset bundle and register it with the EnemySkinRegistry.
//whatever you're doing to retrieve your skin scriptable object from your asset bundle
EnemySkinRegistry.RegisterSkin(mySkin);
The BaseSkin and BaseSkinner classes implement the necessary interfaces to register with the EnemySkinRegistry.
You're also free to add child classes to the existing Skin and Skinner types to extend them with whatever is to your liking. Permissions for these classes are pretty lax. If a member isn't public in one of these classes, it's protected. Don't you do nothing crazy though.
If you'd prefer something leaner or want something more custom, consider looking at the developer section of the EnemySkinRegistry mod page.
Deprecated: Armature Maps
UPDATE VERSION 1.1.0
I am no longer supporting the Armature Map method in future releases. Setting up meshes to work using this method was brittle and difficult to get working. What's more is that it was complicated for other people to use and computationally expensive. I had several people come to me with issues thinking that the armature mapper would work with any model you threw at it and others that had trouble getting the models to match up despite feeling they had followed all of the set up instructions to the letter. The only reason you'd want to use this over the "Replace Mesh" method would be to have a differently-proportioned model without haveing to re-animate everything like I did for the Nymph Bracken skin. Even then, several models (Old-Bird, Nutcracker, Blind Dog...) place hard limits on that with special transforms that muck things up and it's not guaranteed to look any good anyway. I will fully admit to being too gosh darn stupid to maintain this, but I don't hate myself enough to keep trying. Close. But no.
Only enemies up to v50 have been tested to make sure they work, and the last time they were was around May of 2024. Anything beyond that you will have to get working yourself, and in my experience it's unpleasant. Also if I ever get around to mid-game application of skins, this will not work with it. That might've been a day one feature had it not been for the armature mapping method.
For those that have already made model mods with armature maps, you don't have to update your mod. If you think you can, it's probably a good idea to do so, but for compatibility, I'm leaving this stuff in. I'm just not gonna be updating it, so if a future game update breaks it, the best I'm gonna do is slap a bandaid over it.
For The Brave
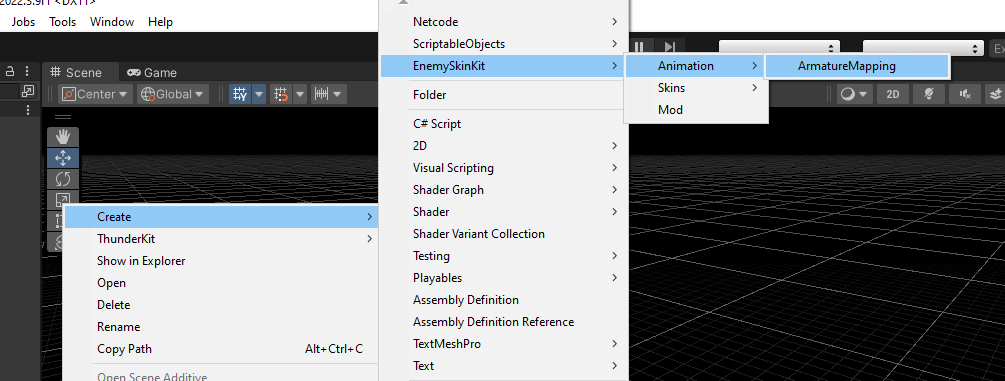
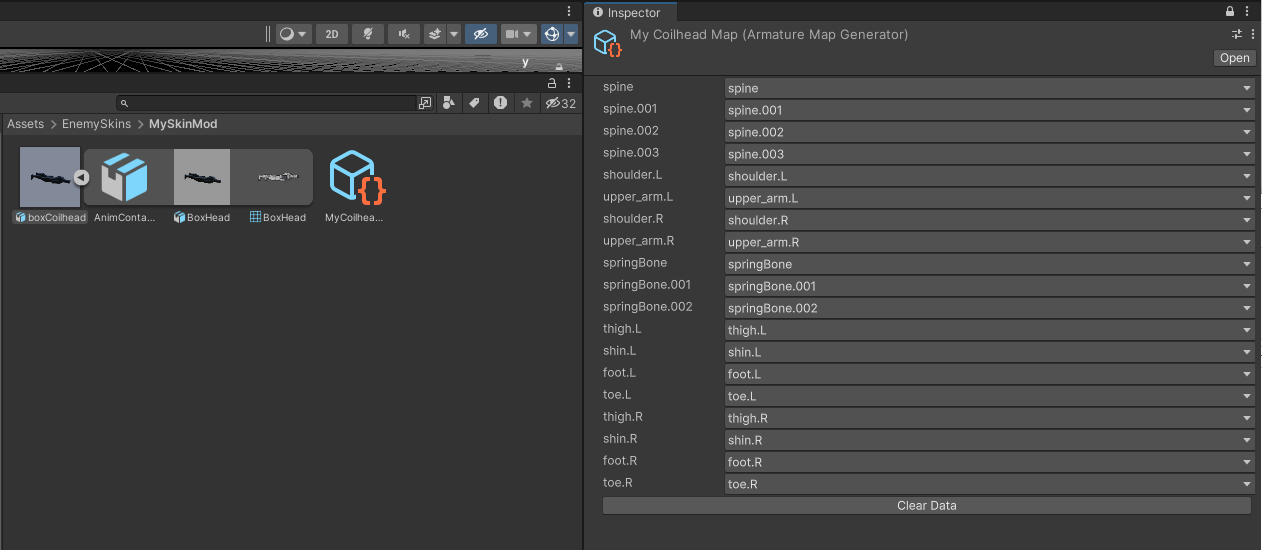
To get an armature map set up, right click in the Project Window, and select Create > EnemySkinKit > Animation > Armature Mapping.
This Scriptable Object will first display two fields: a "source" hierarchy and a "destination" hierarchy. "Source" is the hierarchy of the vanilla enemy armature. I've included a prefab for each one of these in the mods package. You should be able to find the prefab you need in <YOUR_UNITY_PROJECT>/Packages/EnemySkinKit/EnemyRigs/<ENEMY_YOU_WANT_TO_SKIN>.
You'll probably want to lock the inspector so you don't accitdentally take focus off of it while browsing to enemy armature prefab. Just click the little lock at the top.

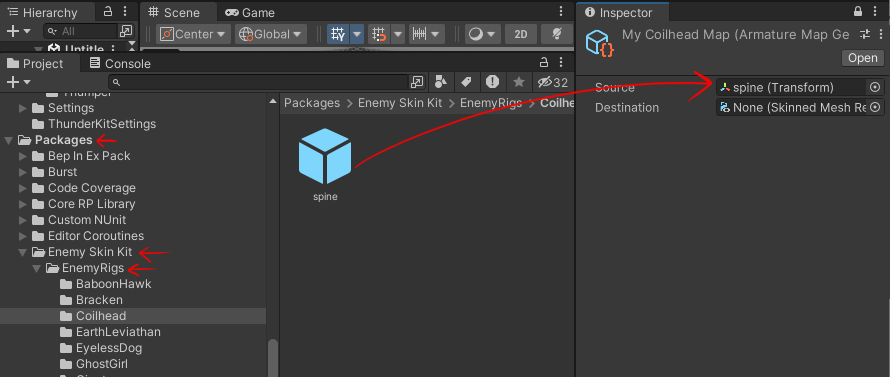
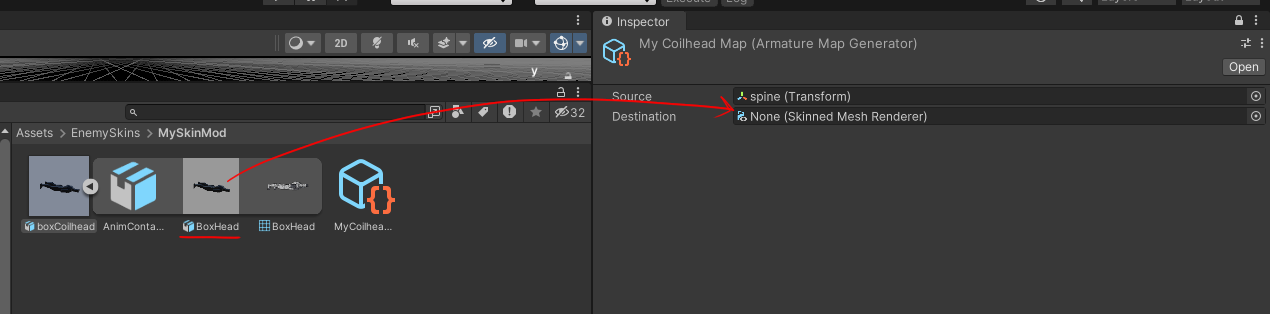
For destination, drag in the part of your prefab object that has the skinned mesh component.
Once both of those fields have been added, the ArmatureMap in the inspector should expand and show the mapping of source bones to destination bones. If a source bone name matches a destination bone name, the ArmatureMap will automatically map them. At runtime, a source bone will have its animation copied by whatever destination bone has been mapped to it. Once your ArmatureMap is set up in this way, you can add it to the SkinnedMeshAction.
Don't forget to unlock the inspector if you locked it.
Also certain enemies have special cases where you can't name the bone you're mapping to whatever you like and instead have to ensure that it matches in the armature itself. This is because these bones affect deform bones, but aren't listed in the skinned mesh as one of the bone transforms. Here's a table with all of them.
| Nutcracker | Eyeless Dog | Bunker Spider | Hoarder Bug | Forest Keeper | Old Bird | Butler |
|---|---|---|---|---|---|---|
| spinecontainer | Armature | Armature | Armature | metarig | TorsoContainer | metarig |
| Neck1Container | GunArmContainer | NeckContainer |
With the exception of Neck1Container and spinecontainer, all of these are the armature root, so all you'll need to worry about with them is giving your root, or a child of it, the same name. The other two you'll just want to have a root bone for the blind dog's neck and the nutcracker's torso respectively.
That's about as hairy as it gets. For actually creating the Skinned Meshes, I'd recommend getting one of the FBX files that come packaged with this mod. The folder for that is in the same folder as the EnemyRigs folder. You can get a rigged model in the correct position and import it to blender or your poison of choice and work from there. Teaching how to create and rig a skeletal mesh is a little beyond the scope of this little ReadMe. But there are plenty of resources out there for you to get started if you're new.
Also keep in mind that the armature reflector isn't magic. It can allow for altering the proportions of an enemy in most cases, but it's going to work better the closer you are to the original armature. For this reason, I reccommend using the included example models as a starting point (and for sanity checks) since they all use lightly modified versions of the vanilla armatures and have all been verified to move the way they're supposed to. If you want to use your own armature (the main reason to do so would be to avoid doing the weight painting yourself) you'll need to make sure that the bone chains are oriented in the same way in the mod armature as they are in the example armature. Elsewise the rotations and translations will copy over to the wrong axes, so arms will twist instead of bend, for example. You can check this visually in blender by enabling bone axes in the armature viewport display.
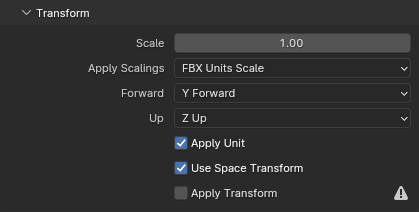
Finally, when you get ready to export your model, you'll probably want to copy my usual export settings for unity:
Note on Sound Replacement
Because this mod seeks to apply skins on a per-instance basis, I normally opt to swap out references to sounds when the enemy spawns (I recommend doing the same if you intend to extend a base skin). That runs into an issue with certain sounds that are stored in Lethal Company per enemy TYPE (in a Scriptable Object) and not per enemy INSTANCE (in a MonoBehaviour). My solution for these cases is to silence the vanilla AudioSource, add a modded one, then play the sound through that at the correct time. This unfortunately bleeds over to any other sound effects that use these sources, and the events that play these sounds are time-consuming for me to test. So if you're running into trouble with certain sounds not playing and the enemy you're skinning has a "stun" sound or a "hit body" sound attached to it, consider setting that to "retain" if it's not important that either of those sounds are changed from vanilla.
Additionally, these clips will also cause the replacement of Audio sources that other clips play out of:
- Baboon Hawk: intimidate, intimidateVoice, death, killPlayer, enterFight
- Nutcracker: hitEye, hitBody, reload, headPopUp
- Old Bird: Brainwashing clips, stomp clips
- Butler: stab, coat rustle, inflate, pop
- Tulip Snake: all sounds (why)
The sound replacement is designed to work despite this, I'm just letting you know in case this more brittle method fails. And if something isn't working how you expect, please report an issue on github or send me a message through the Lethal Company modding discord.
Note on Material Replacement and Post Processing
Lethal Company is an HDRP project that uses HDRP materials, and so that's why we have to select the HDRP project to start with. These materials have their shaders compiled according to the settings in your project before they're bundled up for use in the game. So we need to configure our project in the same way that Lethal Company has its pipeline configured if we want custom materials to have the grainy look Lethal Company is known for, or at least set it up in such a way that it applies the post processing effects. I've gotten the Custom Pass that does the post processing to look at my models by changing the "Lit Shader Mode" to Forward in the Performant pipeline (Assets/Settings/HDRP Performant) and the Project Settings -> Graphics -> HDRP Global Settings -> Frame Settings, but I couldn't tell you why that works exactly.
Tips
- Use a developer mod like Hamunii's "Dev Tools" to enable cheats and debug options while testing.
- If you run into trouble getting the armature reflector working, get it working with one of the example models first to help root out what's going wrong with your model.
- Use a tool like Asset Ripper or Asset Studio to rip game assets from you install of Lethal Company and get any vanilla resources you may want to examine or modify.
Get Help and Give Feedback
You can find me on the Lethal Company modding discord or you can open up an issue on one of my github repositories if you want to request a new feature, additional enemy events, or run into an issue that this readme doesn't address.